
VoucherPDF helps Shopify merchants create, sell, personalize, issue, and manage gift vouchers directly from their Shopify store.
With VoucherPDF, you can:
- Turn a Shopify product into a voucher product.
- Set the voucher value and validity period.
- Choose where vouchers can be redeemed.
- Create personalized gift voucher experiences.
- Collect recipient information directly on the storefront.
- Let customers add a sender name and personal gift message.
- Automatically handle vouchers after an order is paid.
- Create and manage vouchers from the Shopify admin.
- Issue vouchers manually or in bulk.
- Track active and redeemed vouchers.
- Create professional PDF voucher designs.
- Use different designs for different voucher products.
- Create custom voucher designs based on existing templates.
A typical workflow looks like this:
Create Voucher Product → Configure Voucher → Add Gift Form → Customer Purchases → Voucher Is Issued → Recipient Receives Voucher → Recipient Shops → Voucher Is Redeemed → Merchant Tracks Voucher
Getting Started
After installing VoucherPDF, open the app from your Shopify admin.
You will find the main VoucherPDF sections in the Shopify sidebar:
- Vouchers
- Voucher Products
- Designs
- Storefront Block
- Settings
- Plans
Each section controls a different part of the voucher workflow.
Create a Voucher Product
Before customers can purchase a voucher, you need to tell VoucherPDF which Shopify product should be treated as a voucher.
Step 1: Add a voucher product
Go to:
Shopify Admin → VoucherPDF → Voucher Products
Then click Add a voucher product – Choose a product.
A product selector will appear.
You can search for your product and select the product you want to use.
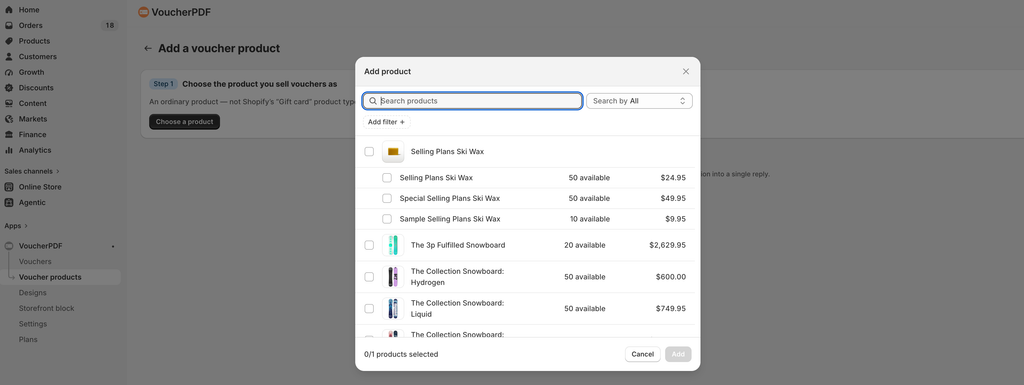
VoucherPDF uses a normal Shopify product as the product customers purchase for the voucher.
Important: You don’t need to create a special Shopify “Gift Card” product type. VoucherPDF lets you select an ordinary Shopify product and configure it as a voucher product.
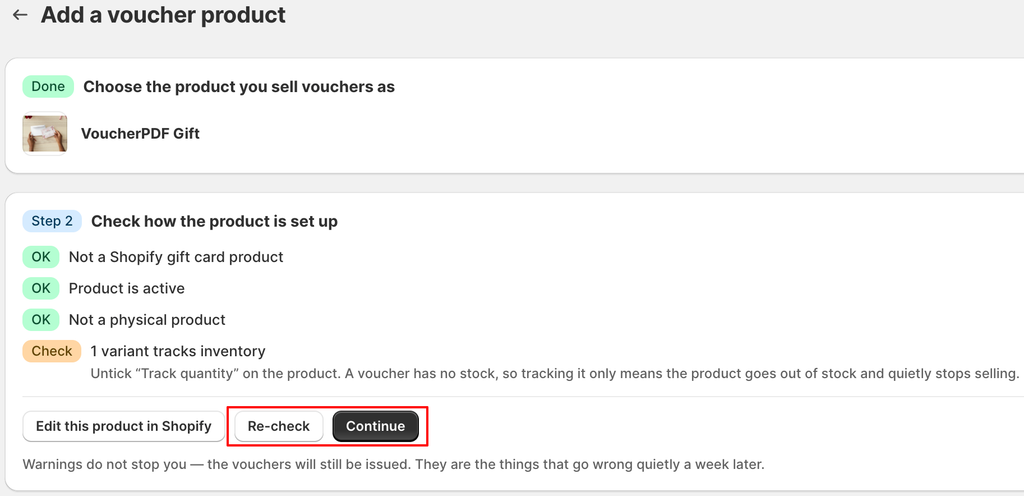
Step 2: Product Check
After selecting a product, VoucherPDF checks the product before you continue.
The product check may display a warning if something needs your attention.
If a warning appears, click Review to see the details.
Make sure the product and its variants are correctly configured before continuing.
Step 3: Set what the voucher is worth
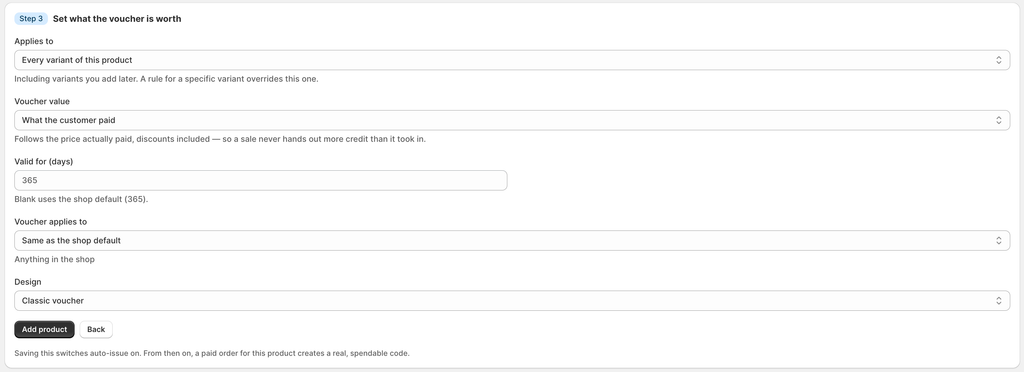
After choosing the product, configure the voucher value.
This section controls how much credit the customer receives when purchasing the voucher.
Applies to
Use Applies to to determine which product variants use the voucher configuration.
- Every variant of this product
This applies the configuration to all current variants and can also include variants added later.
A specific variant rule can override a general product-level rule when supported by the configuration.
- Default:
This applies to specific variants.
Voucher Value
The Voucher value setting determines how the voucher amount is calculated.
- What the customer paid
When this option is used, the voucher value follows the amount actually paid by the customer, including applicable discounts.
Example:
Original product price: $50
Customer receives a discount and pays: $40
Voucher value: $40
This prevents a discounted purchase from creating a voucher with a higher value than the amount collected from the customer.
This is especially useful when your voucher products can be discounted through Shopify promotions or other pricing rules.
- A fixed amount
When using this option, the voucher value remains fixed, regardless of any applied discounts.
Example:
Original product price: $50
Customer receives a discount and pays: $40
Voucher value: $50
Voucher Validity
Use Valid for (days) to determine how long the voucher remains valid.
For example:
- 365 days
This means the voucher is valid for 365 days.
If the field is left blank, VoucherPDF uses the shop’s default validity period.
Voucher Applies To
Voucher applies to controls the scope of where a generated voucher discount code can be redeemed at checkout.
- Same as the shop default: Uses the global store-wide default rules set in the app.
- Anything in the shop (currently selected): Allows the voucher to be used on any product available in the store.
- Only certain collections: Restricts the voucher usage exclusively to specific product collections.
- Only certain products: Limits the voucher redemption to selected individual products.
Choose a Voucher Design
The Design field determines which PDF design is used when this voucher is issued.
You can select from the available VoucherPDF designs.
Different voucher products can use different designs.
For example:
Regular Gift Voucher → Classic Voucher
Birthday Voucher → Gift Letter
Premium Gift Voucher → Elegant Dark
This allows you to create different visual experiences for different voucher products and occasions.
Save the Voucher Product
After configuring, click Add product.
Your Shopify product is now configured as a VoucherPDF voucher product.
Storefront Gift Voucher Form
After creating your voucher product, the next step is to add the gift voucher form to your storefront.
The form allows customers to turn a normal voucher purchase into a personalized gift.
Go to:
VoucherPDF → Storefront Block – Switch to the Gift Form.
You can then configure how the gift form appears on your Shopify product page.
Then open: App embeds
Search for: VoucherPDF
Enable: Gift voucher form (auto)
This allows VoucherPDF to automatically display the gift form on configured voucher products.
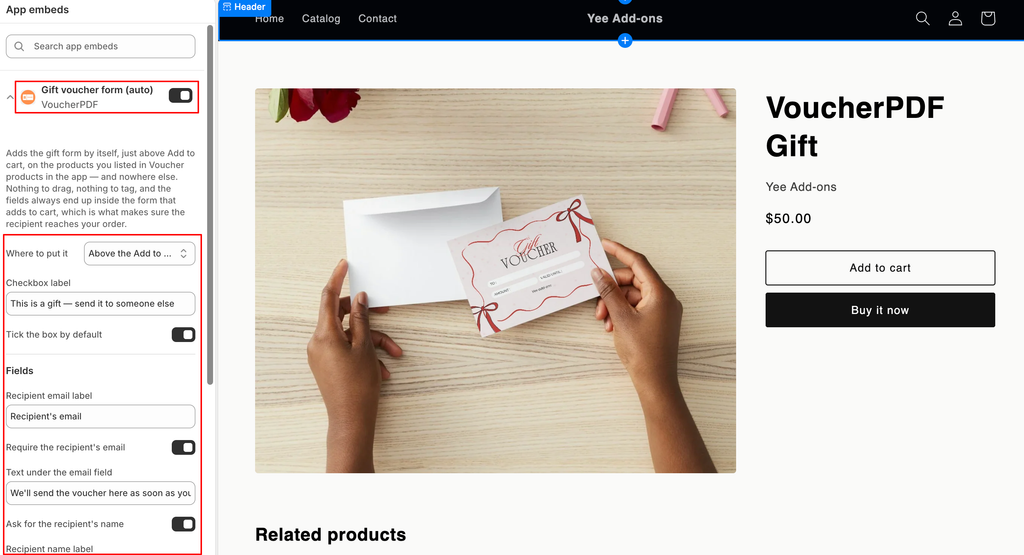
Once the voucher product and Gift Voucher Form are configured, customers can purchase the voucher directly from your storefront.
Complete Customer Workflow
The typical customer workflow is:
Step 1
Customer visits your Shopify store.
Step 2
Customer opens your voucher product.
Step 3
Customer chooses the voucher amount.
Step 4
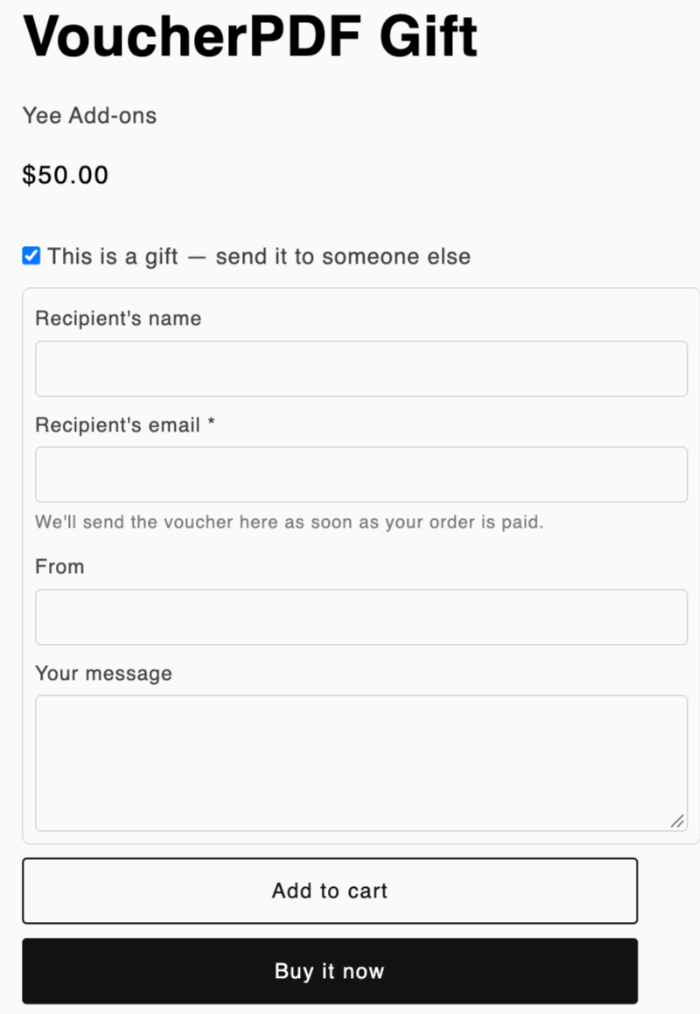
Customer selects: This is a gift — send it to someone else
Step 5
Customer enters:
- Recipient’s name
- Recipient’s email
- Sender’s name
- Personal message
depending on the fields enabled by the merchant.
Step 6
Customer adds the voucher to the cart.
Step 7
Customer completes Shopify checkout.
Step 8
VoucherPDF creates the voucher according to the configured voucher product settings.
Step 9
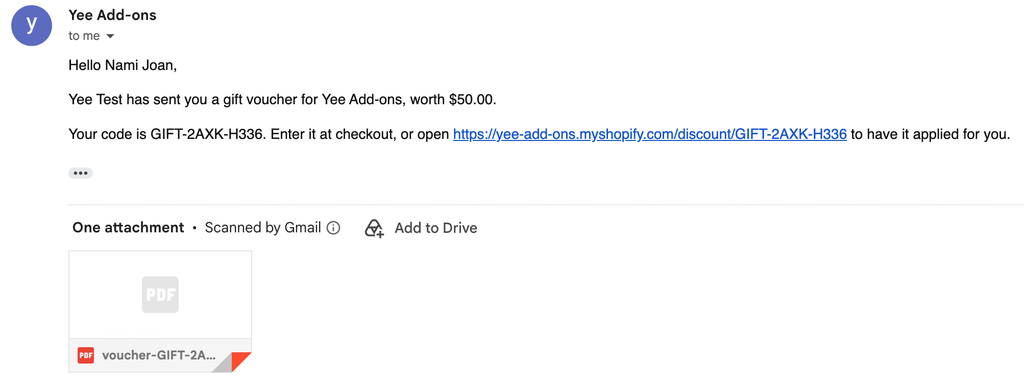
The voucher can be delivered to the intended recipient according to the configured workflow.
Step 10
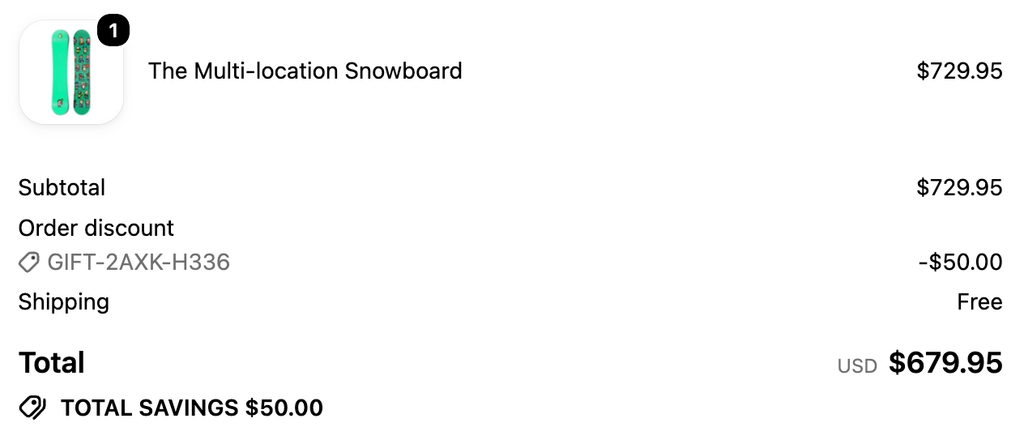
The recipient uses the voucher when shopping at the store.
Voucher Dashboard
Go to:
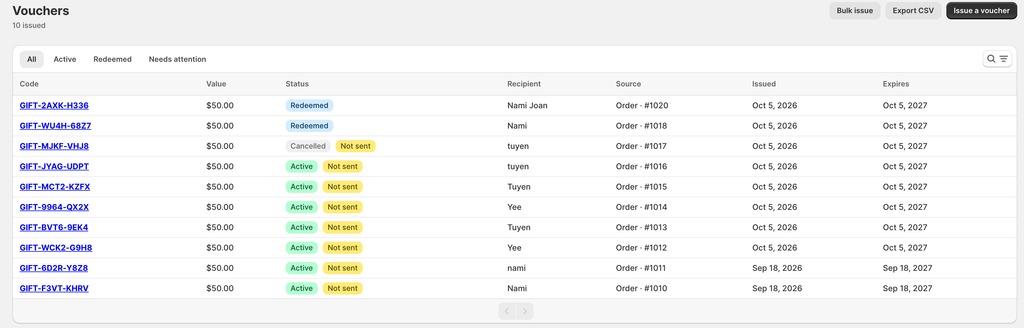
VoucherPDF → Vouchers
The Vouchers page is the central place for managing issued vouchers.
From here, you can view and manage vouchers issued through your store.
The dashboard includes status filters such as:
- All
- Active
- Redeemed
- Needs attention
Issue a Voucher Manually
You can issue a voucher manually from the Vouchers page.
Click:
Issue a voucher
This is useful when you need to create a voucher outside the normal storefront purchase workflow.
For example: Customer service compensation, Offline sales, Special customer gifts, Manual promotional vouchers, Business partnerships,…
Follow the voucher issuance form and provide the required information.
Bulk Issue Vouchers
If you need to create multiple vouchers, use: Bulk issue
Bulk issuing is useful for: Promotions, Marketing campaigns, Corporate gifts, Events, Large customer lists, Seasonal campaigns,…
Instead of creating vouchers individually, you can handle multiple vouchers in a single workflow.
Export Voucher Data
The Vouchers page also provides an Export CSV option.
Use this to export voucher information for external analysis, reporting, or record keeping.
Voucher Designs
Go to:
VoucherPDF → Designs
This section lets you manage the visual templates used for your vouchers.
VoucherPDF includes multiple ready-to-use designs.
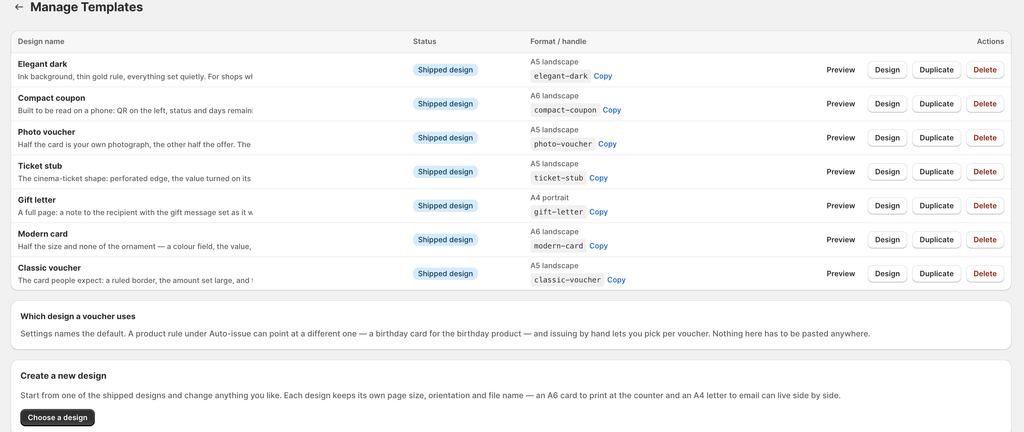
And if the existing designs don’t perfectly match your brand, you can create your own.
Simply start with one of the existing designs and customize it to fit your store.