Conditional logic enables you to show or hide specific content or sections based on certain conditions or user interactions.
This post will introduce you to conditional logic in Elementor Forms.
Table of contents:
Getting Started
Here are some ways to set your condition rule.
- Show/Hide: This logic will be shown or hidden when conditions are met.
- Select Field: Which field would you like this logic to depend on?
- Comparison: Options include: is, is not, empty, not empty, contains, does not contain, starts with, ends with, greater than, and less than.
- Select Choice: What value would you like the field to contain for this condition to apply? This field will deactivate if you select empty or not empty from the comparison dropdown.
How to Apply Conditional Logic in Elementor Forms?
Step 1: Install and Activate the plugin
Once you’ve downloaded a plugin, you’ll need to install it on your website. Log into your WordPress admin dashboard. Navigate to the “Plugins” section and click on “Add New.” Search for the plugin by name and click “Install Now” once you find it. Then, activate the plugin.
Step 2: Create a new form
Scroll down to your WordPress dashboard after the plugin has been installed. Go to Page – Create a new page or choose an existing one – Edit with Elementor Forms.
Step 3: Add Form Fields
Drag and drop the form fields you need for your form, such as text fields, checkboxes, radio buttons, or dropdowns.
Step 4: Enable Conditional Logic
Select the form field for which you want to apply conditional logic. Look for the “Advanced”, check on the Enable Conditional Logic option.
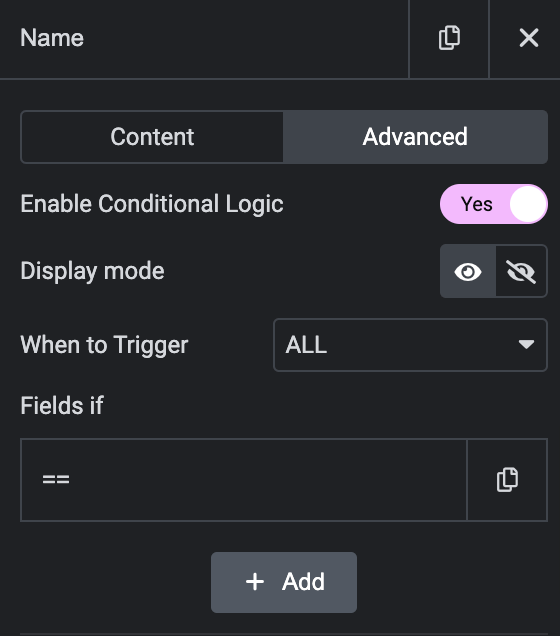
Step 5: Set the Condition Rules
Specify the condition rules by defining the logic that triggers the condition.
- Show Fields: You have the option to show, hide the field based on the condition.
- Conditions Trigger: Choose between All (AND) or Any (OR) for gate operations.
- Field ID: Enter the field ID on which you want to trigger the condition, you can also use dynamic tags at the right side of Field ID input, simply click on the field ID and it will put that ID inside the Field Id input for condition.
- Operator: Select operators for the comparison.
- Value to compare: Enter a value for comparison.
For example, you can set a condition like below: Show this field – Other Profession if the user selects “Other” .
You can use multiple conditions with the click of “+ Add Condition” button.
Step 6: Save and test the Form
Preview the page containing the form to ensure that the conditional logic is functioning correctly.
1. Using basic conditional logic
The most common use of conditional logic is to show or hide fields depending on what the user selects.
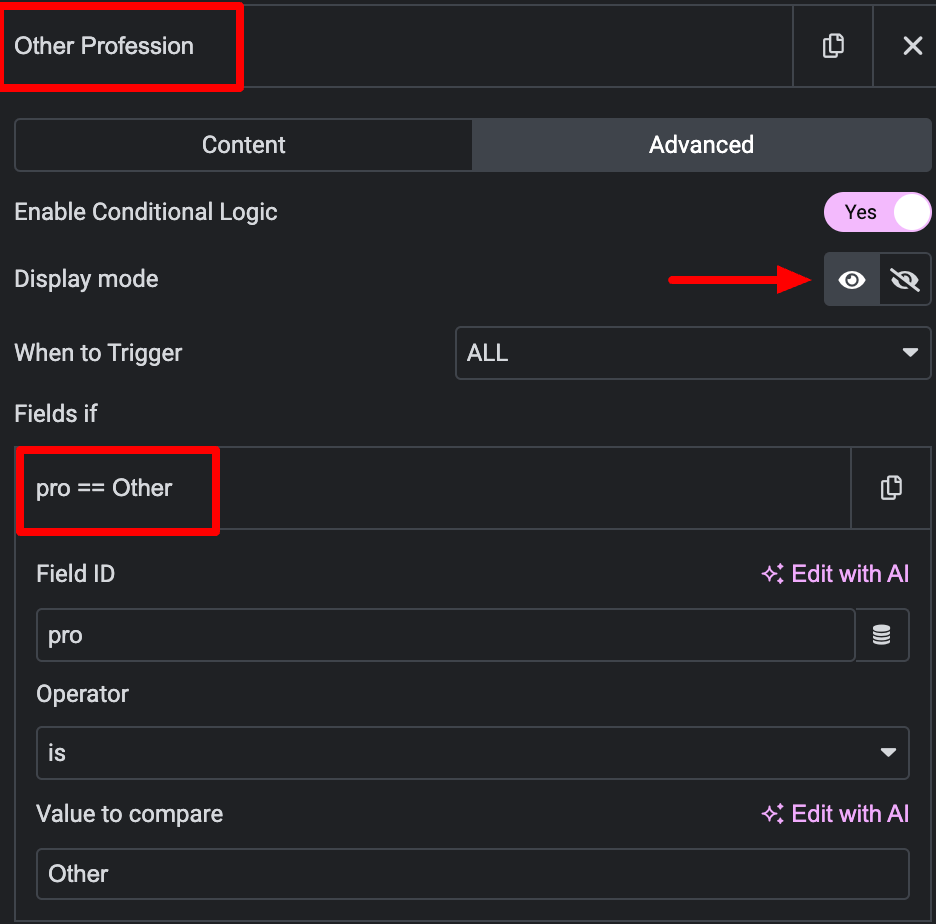
For example, we’ll use conditional logic for Other Profession field. We’ll set the logic to say: Show this field if the What is your profession? radio is set to Other.
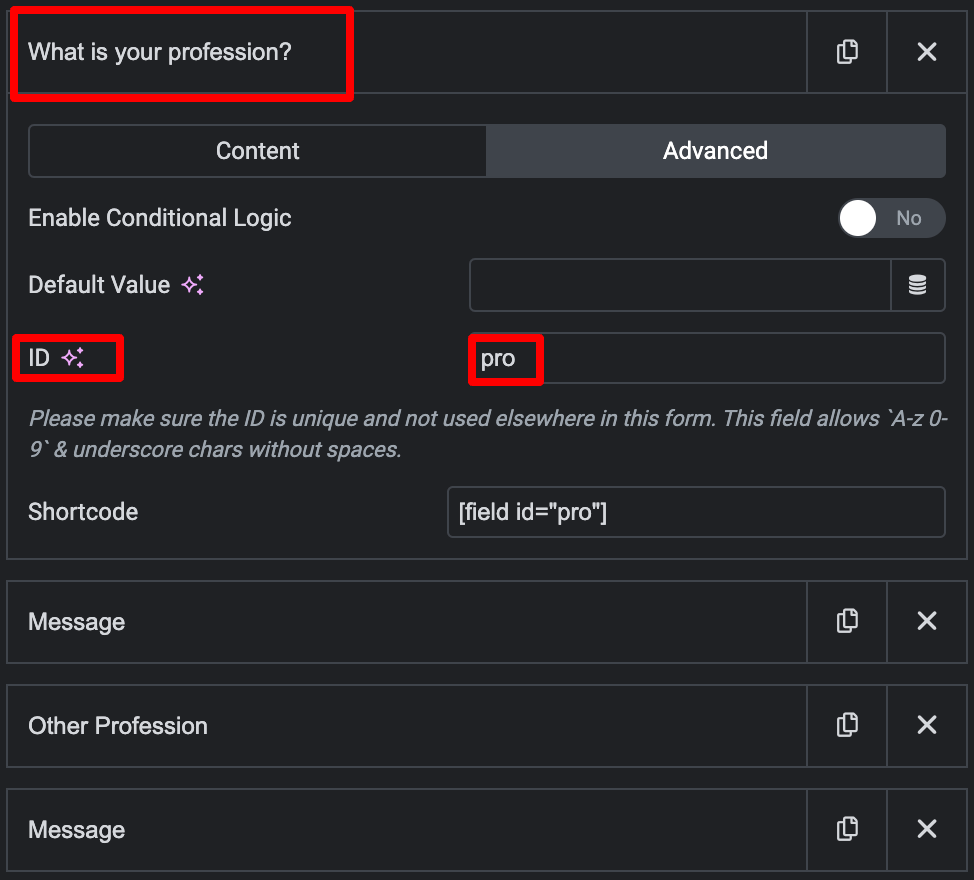
- Step 1: First, set up your fields. As we will be using a radio to handle the display of various selections: Graphic Designer, Interpreter, Other.
- Step 2: As we want Other Profession to show up when Other is selected, we will need to enable conditional logic on Other Profession. Open it by clicking on the field, and click on Enable Conditional Logic section.
- Step 3: Copy the ID of What is your Profession and paste it into Field ID of Other Profession, set Operator is, value to compare is Other.
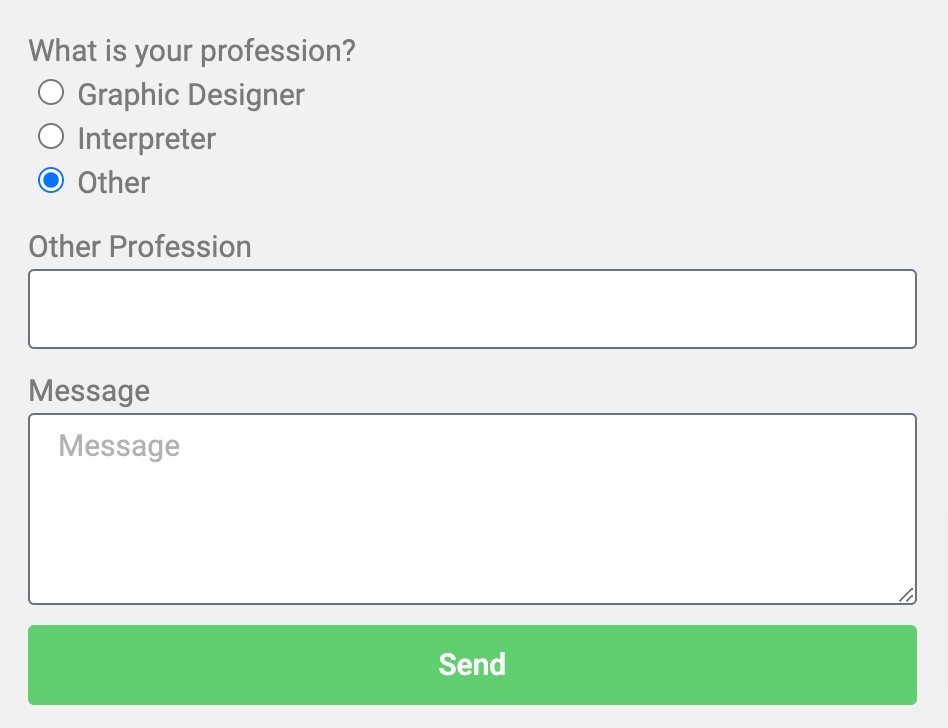
Here is the result, when Other option is selected, the Other Profession field will display.
2. Using complex conditional logic
In some cases, you can discover that one single conditional logic isn’t complex enough. You can include as many conditions as you want, though.
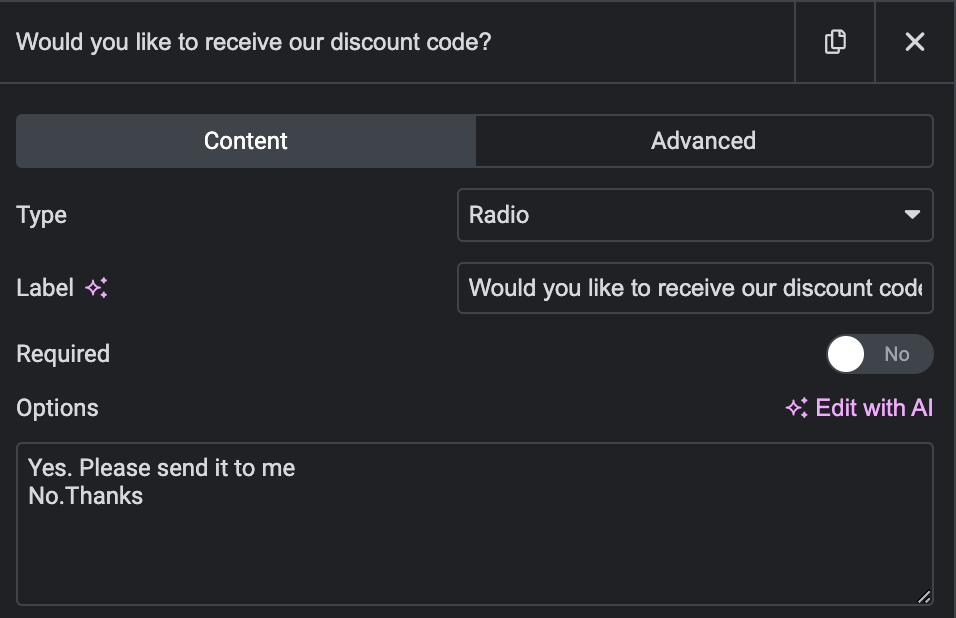
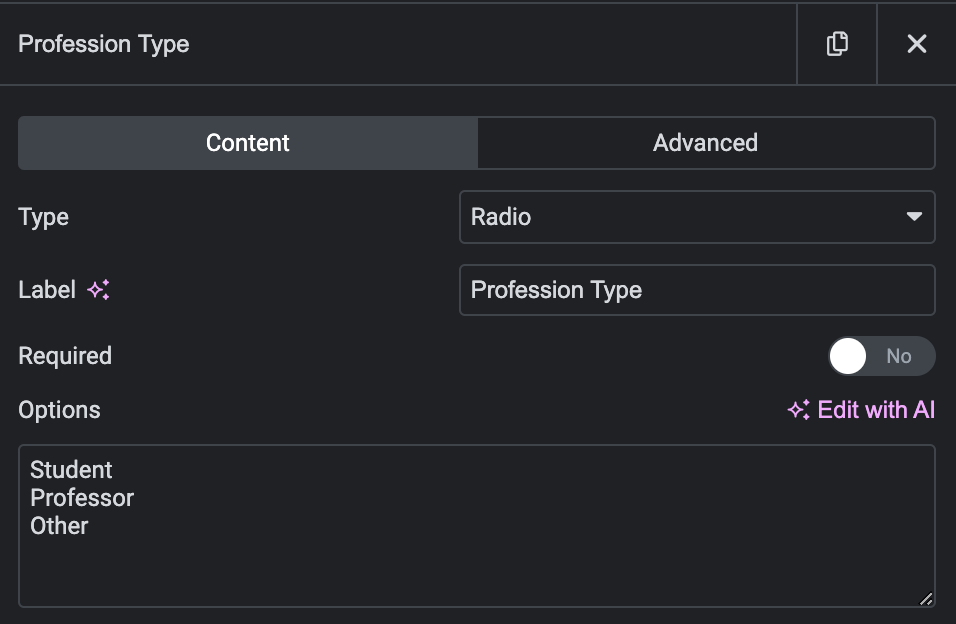
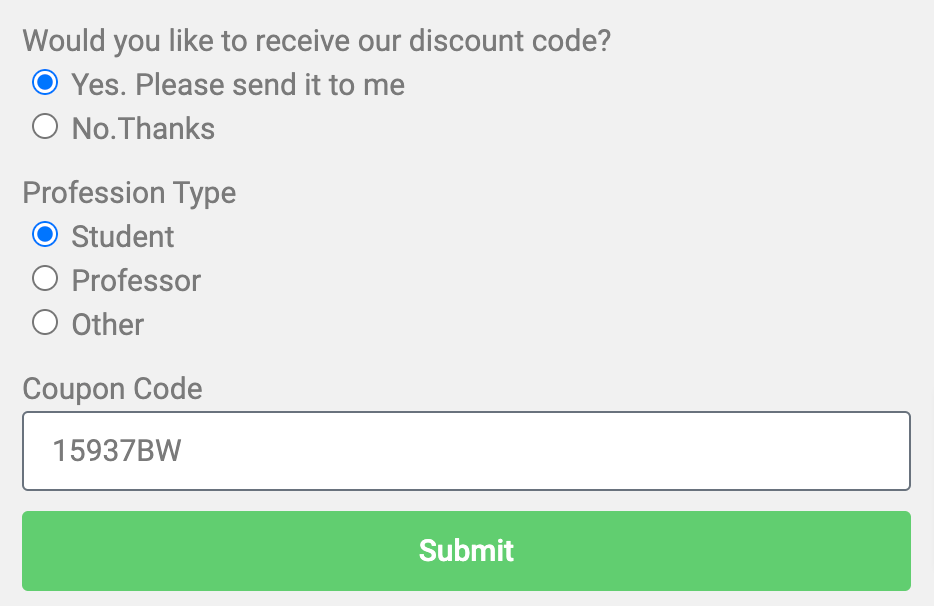
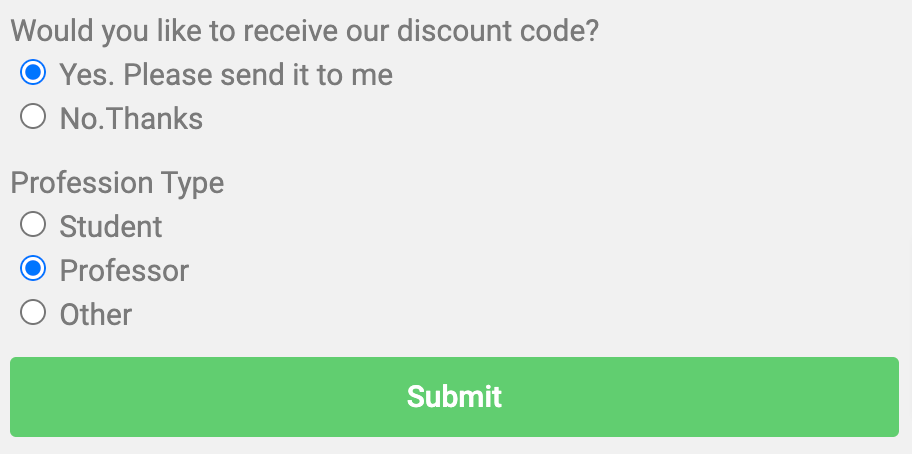
For example, we’ll ask users if they’d like to receive our discount code. However, we only want to display this option if they’ve selected Yes. Please send it to me and chosen Profession Type is Student.
- Step 1: First, set up your fields. As we will be using a radio to handle the display of various selections:
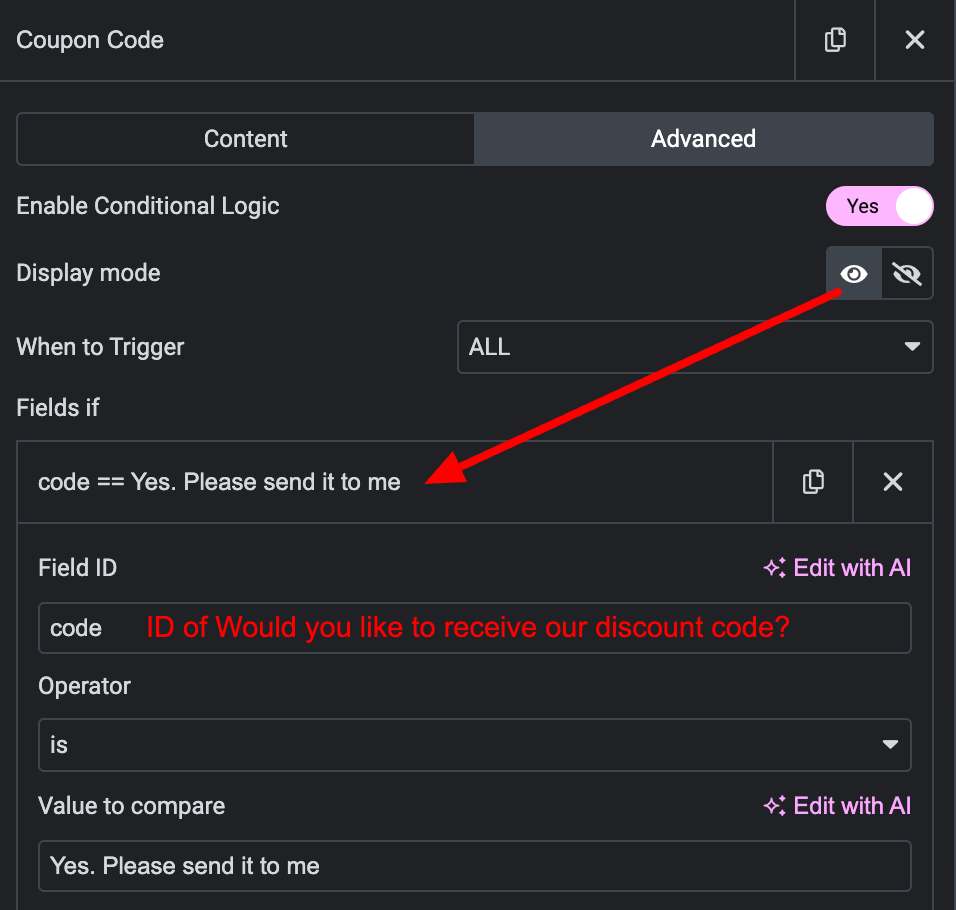
- Step 2: As we want Coupon Code to show up when Yes. Please send it to me AND Student are selected, we will need to enable conditional logic on Coupon Code. Open it by clicking on the field, and click on Enable Conditional Logic section.
- Step 3: Copy the ID of Would you like to receive our discount code? and paste it into Field ID of Coupon Code, set Operator is, value to compare is Yes. Please send it to me. Copy the ID of Profession Type and paste it into Field ID of Coupon Code, set Operator is, value to compare is Student.
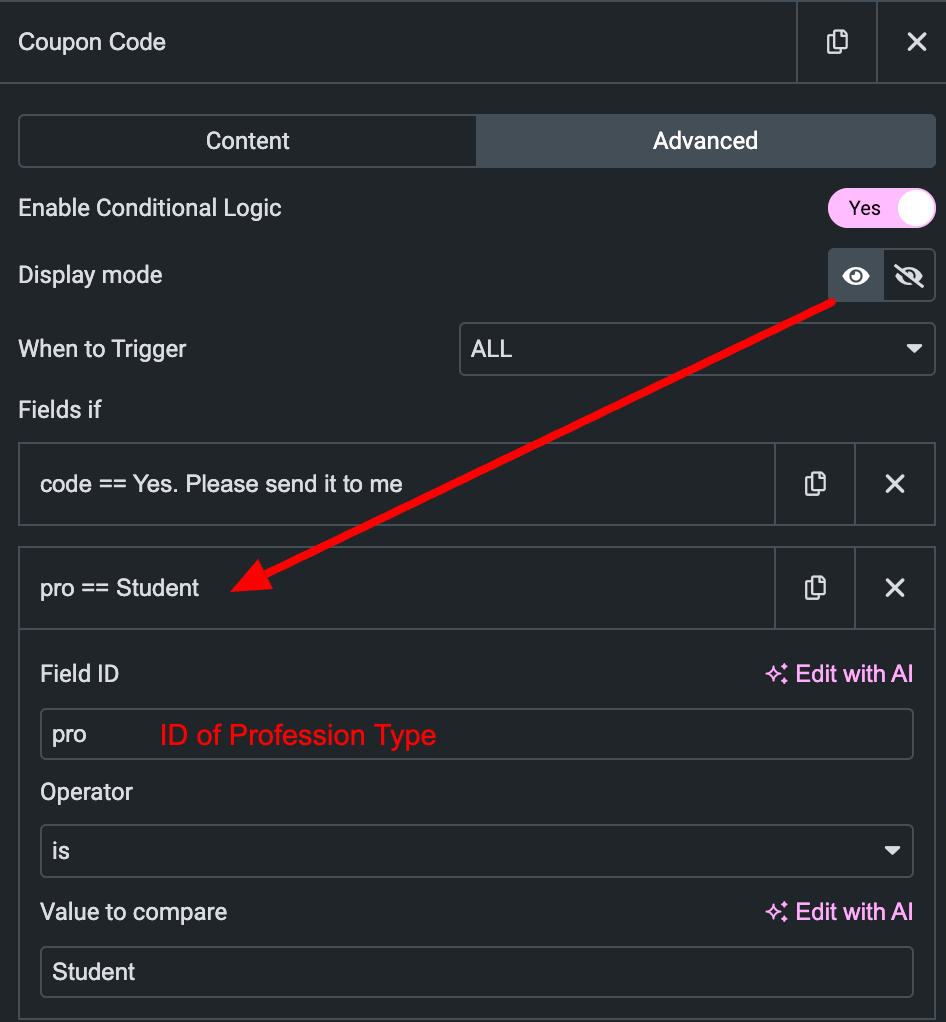
then you can see a preview: Coupon code showed up when Yes. Please send it to me and the Student will be selected simultaneously.
3. Using Conditional Logic Section
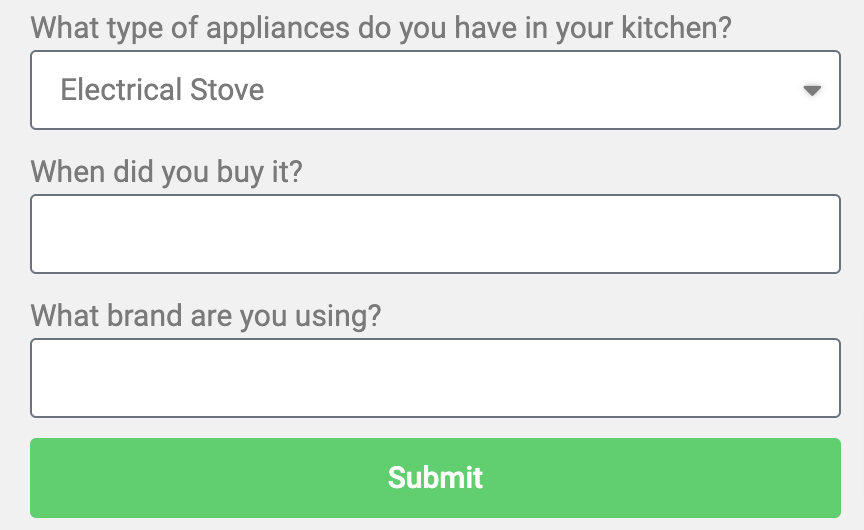
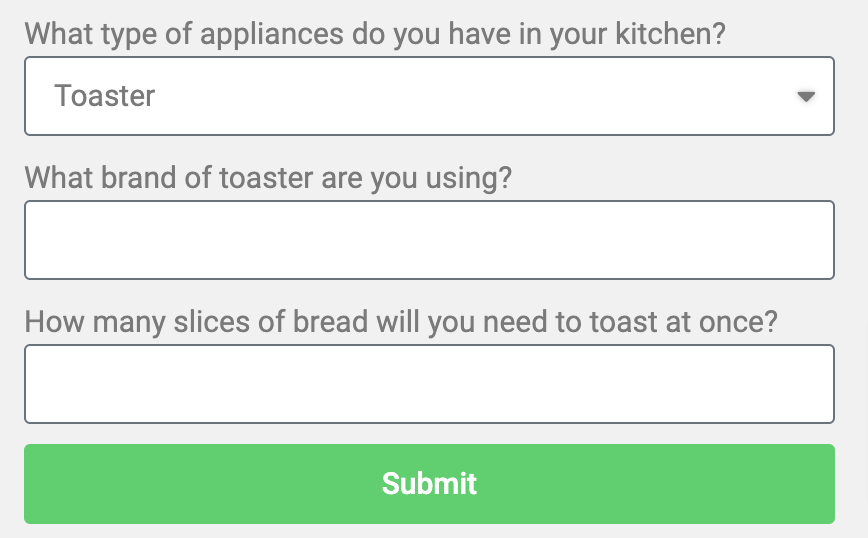
In this example, we will use conditional logic to show different sections of a form based on the user’s input.
You can see our example:
- Step 1: First, set up your fields. As we will be using a dropdown to handle the display of various selections: Electrical Stove, Toaster.
- Step 2: We create the 2 sections of Electrical Stove and Toaster with the necessary fields under each section break. Open the options on one of your sections by clicking on the field, and clicking Enable Conditional Logic.
- Step 3: We’ll repeat the process like above. As we want the Electrical Stove section to show up when Electrical Stove is selected. We have set it to only show if the dropdown button field is Electrical Stove. As we want the Toaster section to show up when Toaster is selected. We have set it to only show if the dropdown button field is Toaster.
Conditional Redirect Submission
It is based on conditions, that users can be redirected to one page or another page after submitting the form.
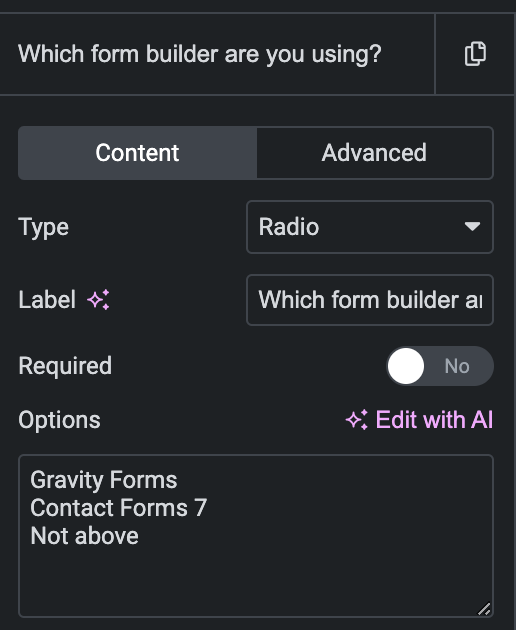
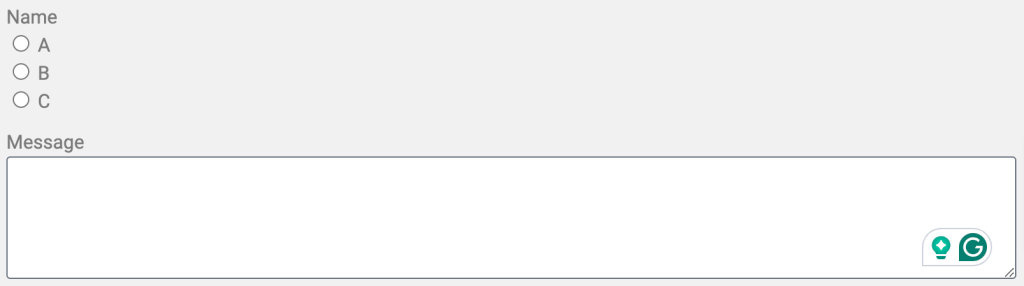
- Step 1: Create a field with three options like below
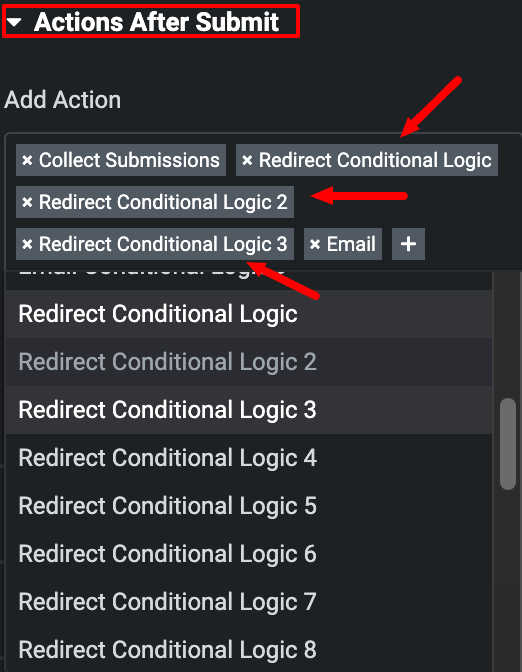
- Step 2: Add Redirect Conditional Logic menu
Navigate to the Action After Submit menu. Click on the Plus icon to add the Redirect Conditional Logic menu. You want to add as many redirect pages as you want, then add as many menu pages accordingly
In this example we need three redirect pages corresponding to 3 options:
- Step 3: Set condition for redirection
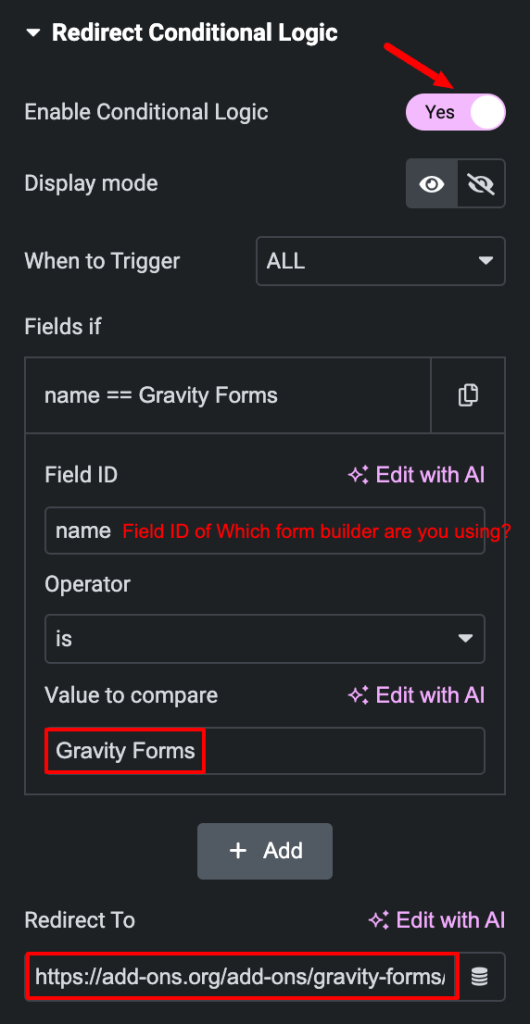
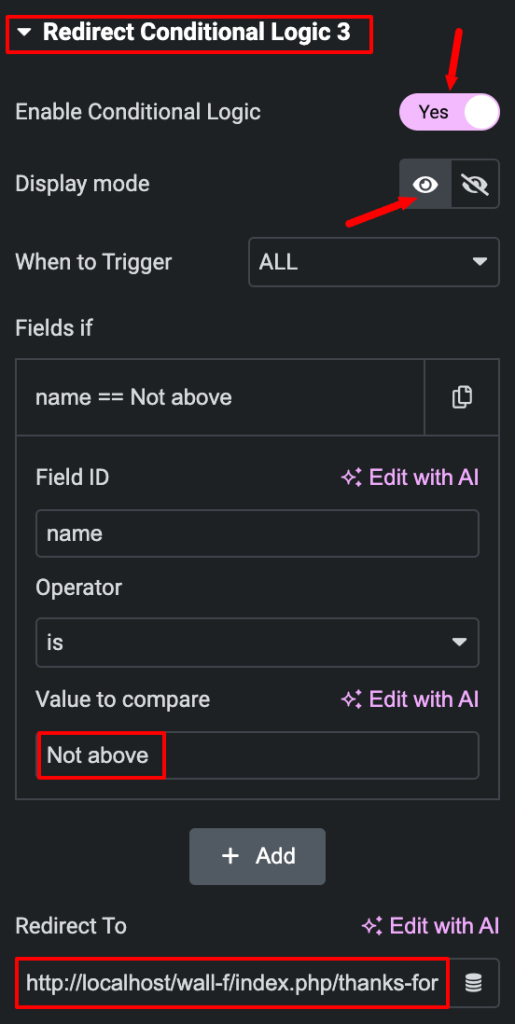
At Redirect Conditional Logic 1: If users choose Gravity Forms as the answer, they will be redirected to the Gravity Forms page.
_ Enable Conditional Logic
_ Choose Display mode: Redirect If
_ Type the Field ID: name
_ Choose Operator: is
_ Type the value: Gravity Form (Option 1)
_ Paste the URL inside the Redirect To input field:
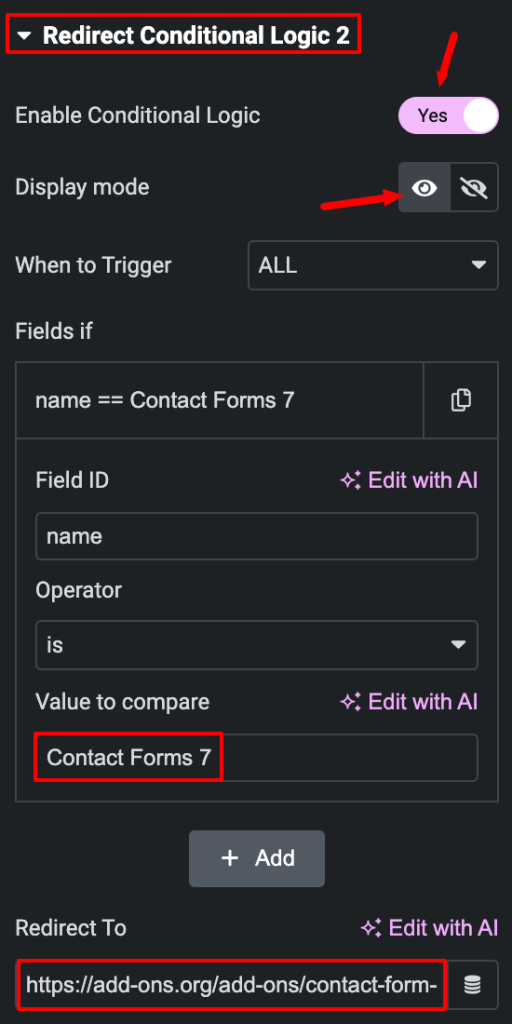
We do the same with the remaining two options:
If users choose Contact Forms 7 as the answer, they will be redirected to the Contact Forms 7 page.
If users choose Not above as the answer, they will be redirected to the Thank you page.
- Step 4: Save and Have a preview
Conditional Notification Email
You can configure a form to be sent to different addresses automatically based on the options chosen.
- Step 1: Create a form
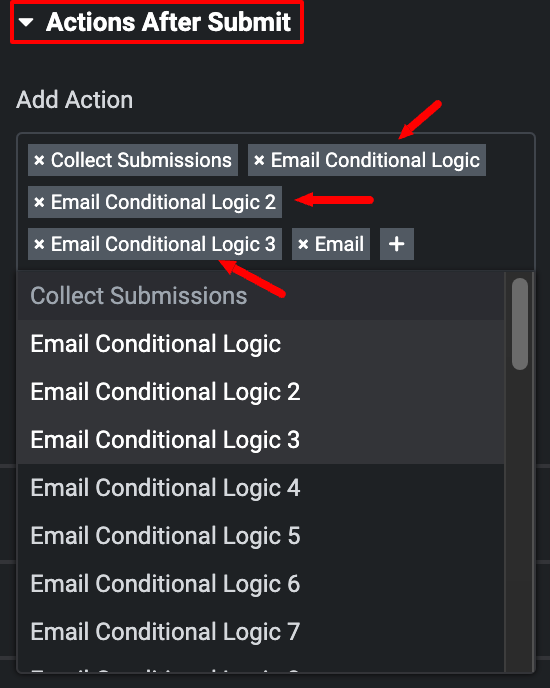
- Step 2: Add Email Conditional Logic menu
Navigate to the Action After Submit menu. Click on the Plus icon to add the Email Conditional Logic menu. You want to add as many emails as you want.
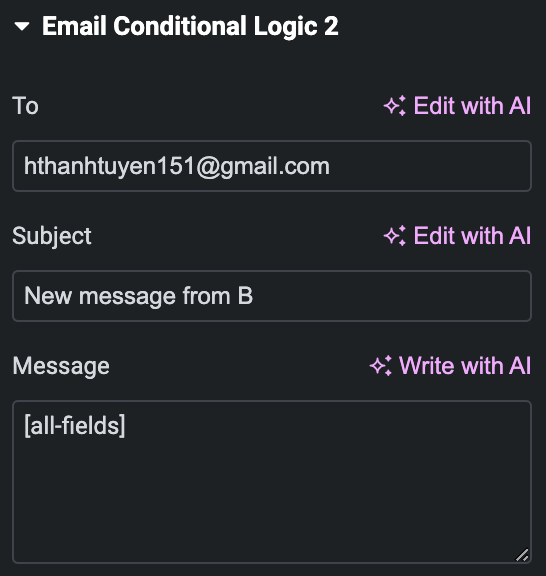
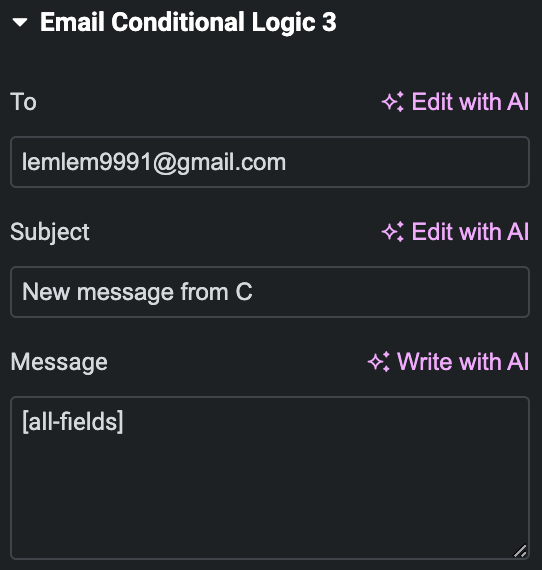
In this example, we have 3 options corresponding to 3 emails:
- Step 3: Set conditions
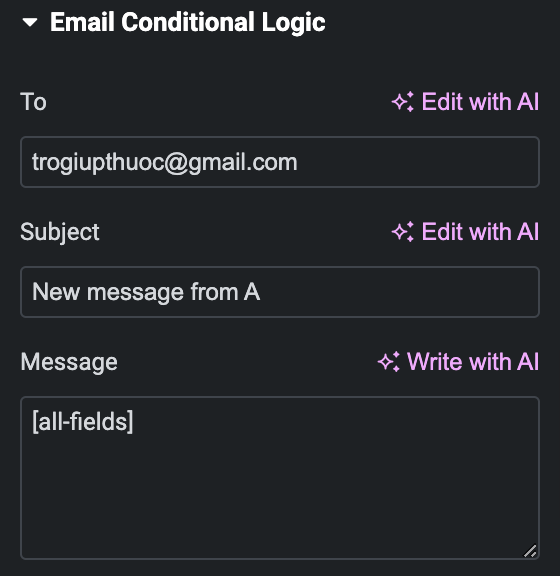
At Email Conditional Logic 1: If users choose A option as the answer, the form will be sent to an email of A
_Insert the email address into the To input field, for which you want to send the email conditionally. It will send the email to the entered email address in the To field based on the condition after the form submission.
_ Enter other input fields: subject, message,….
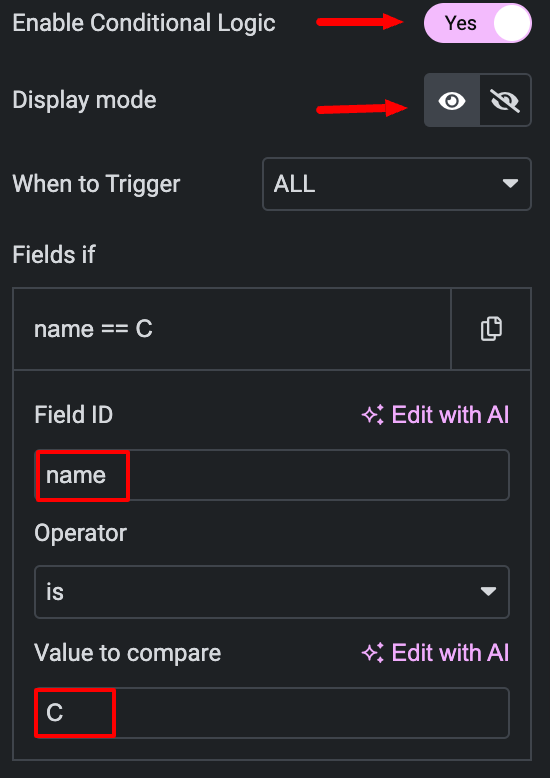
_ Enable Conditional Logic
_ Choose Display mode: Send If
_ Type the Field ID: name
_ Choose Operator: is
_ Type the value: A (Option 1)

We do the same with the remaining two options:
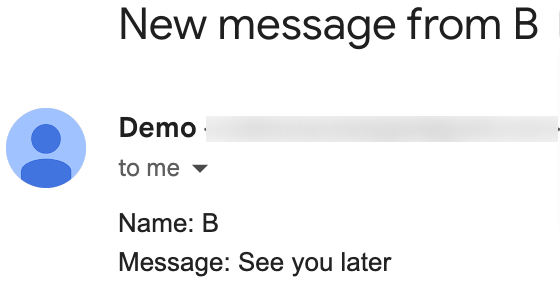
If users choose B as the answer, they will be sent to the email of B.

If users choose C as the answer, they will be sent to the email of C.
- Step 4: Save and Have a preview


Let’s see the result:


That’s it! We hope this article helped you learn how to use conditional logic with Elementor Forms.