Save & Continue for Elementor Forms is a WordPress plugin that extends the functionality of Elementor Pro Forms. It allows users to save their form progress and resume later using a secure token-based link. This is useful for long or multi-step forms such as registrations, applications, or surveys.
Table of contents:
1. Turning on “Saving Later”
Make sure you have installed and activated both Elementor Pro and the Save & Continue for Elementor Forms plugin on your WordPress website. Then:
- Open the page with your form in the Elementor Editor.
- Select the Form Widget → go to the Actions After Submit panel.
- Add the action “Save and Continue”. That’s basically how you turn on the save-later feature for your form.
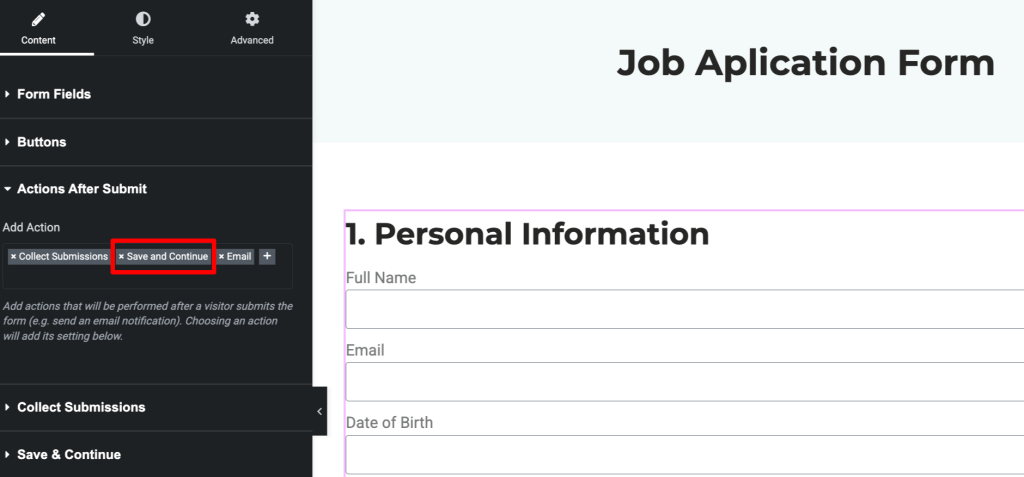
- Then, publish your changes and view the form — you’ll now see the Save and Continue Later button in action.

2. How it works
Step 1: A user fills out part of this form.
Step 2: Instead of submitting, they click Save & Resume Later button.
Step 3: The plugin generates a unique link.
- The link can be copied directly.
- Or, it can be sent to the user’s email.
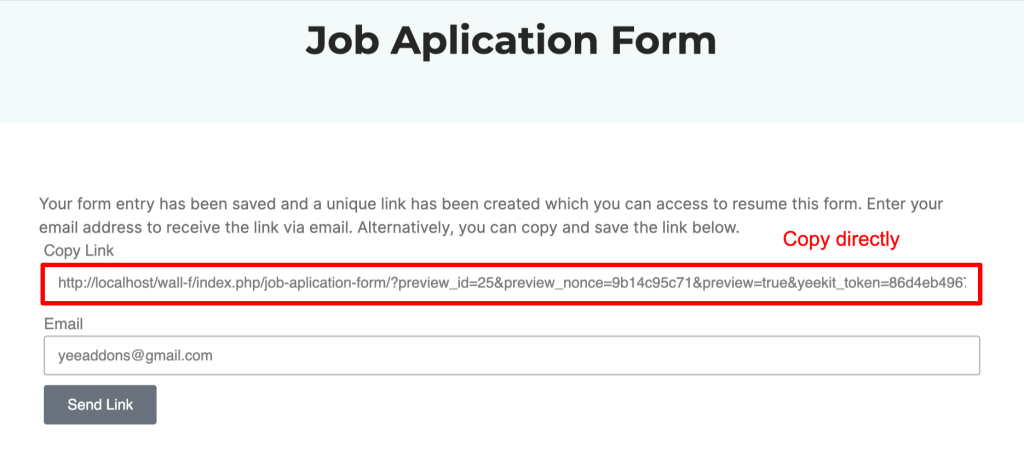

- Step 4: When the user opens this link, the form reloads with their previous answers, allowing them to continue from where they left off.
3. Configuring Save & Continue settings
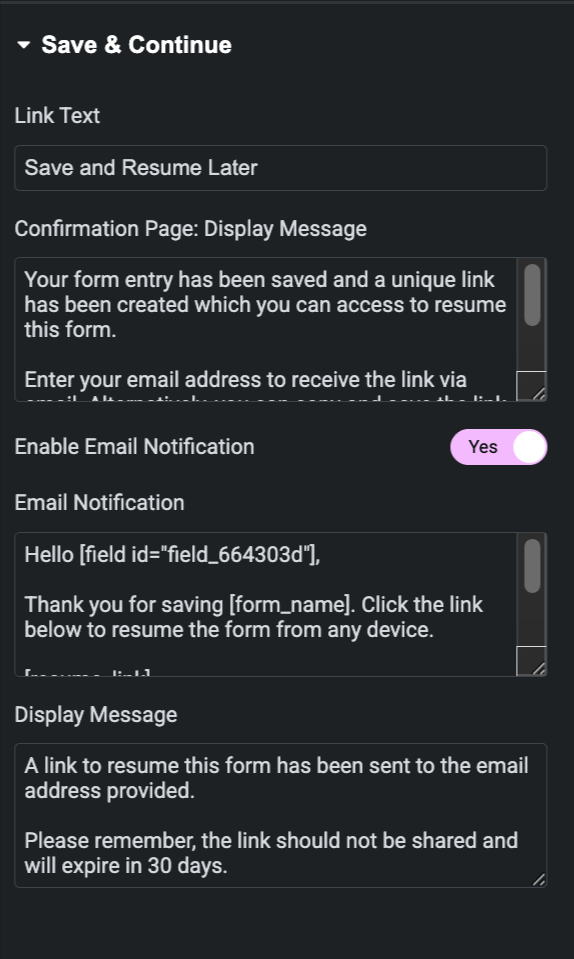
Inside the Save and Continue panel, you can customize:
• Link Text – The label for the save button (default: “Save and Resume Later”).
• Confirmation Message – The text shown after the user saves the form. It can include a [resume_link] placeholder.
• Enable Email Notification – Allow users to receive the resume link by email.
• Email Notification Message – Customize the email text. Remember to include [resume_link].
• Message After Email Sent – The confirmation is displayed once the email with the link has been sent.
4. Using available shortcodes
When configuring your Save and Continue settings, you can use shortcodes to dynamically insert form data into your messages or emails. Simply copy the shortcode for each field and paste it wherever you want it to appear.
Common shortcodes:
- [name] → Displays the user’s name (if a Name field exists).
- [email] → Displays the user’s email address.
- [phone] → Displays the phone number entered.
- [form_name] → Shows the name of the form.
- [resume_link] → Generates the unique link for the user to resume their saved form.
- [field_id] → Use the actual field ID from your Elementor form to display the value of a specific field.
For example: Insert the user’s name and form name into the email notification message:
Hello [name],
Thank you for starting your application in [form_name].
Here is your personal link to continue later: [resume_link]
Please note: This link will expire in 30 days.
That’s it! We hope this article helped you learn how to use Save and Continue later Elementor Forms.