
Introduction
Limit Submissions for Elementor Forms allows you to control how many times a user can submit an Elementor Pro Form within a specific time window.
This protects your forms from spam, abuse, duplicate submissions, repeated coupon claims, vote manipulation, and more.
The plugin supports limiting by:
- IP Address
- Logged-in User ID
- Email field inside the form
Lightweight, fast, and fully integrated with Elementor Pro Forms.
Install the Plugin
- Download the plugin ZIP.
- Go to WordPress Admin → Plugins → Add New → Upload Plugin.
- Select the ZIP file and click Install Now.
- Click Activate Plugin.
Add Limit Submissions to an Elementor Form
Step 1: Open Elementor Editor
Go to the page containing your form and click Edit with Elementor.
Step 2: Select the Form Widget
Click the Elementor Form widget.
Step 3: Open Actions After Submit
Go to:
Content → Actions After Submit
Click the action field and select:
Limit Submissions
Once enabled, the Limit Submissions settings will appear.
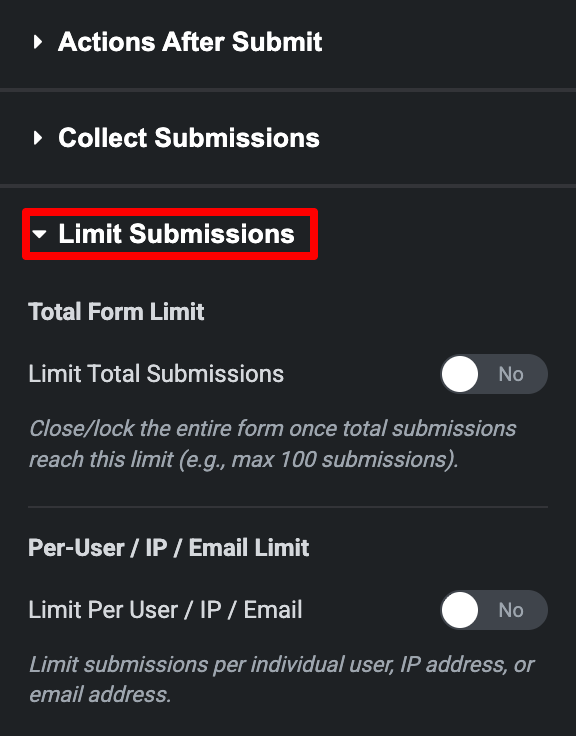
Total Form Limit Settings
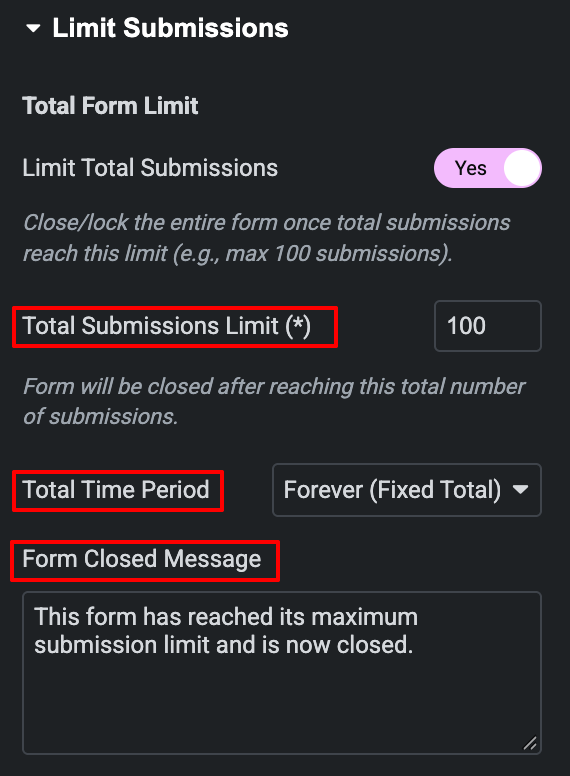
The Total Form Limit controls the maximum number of submissions allowed for the entire form.
Enable Total Submission Limit
Total Submissions Limit
Enter the maximum number of submissions allowed.
For example: 100
This means the form will accept submissions until the total number reaches 100.
After reaching the configured limit, the form will be closed.
Total Time Period
Choose how the total submission limit should be applied: forever, til the end of the day/week/month, per 24 hours,….
Form Closed Message
Enter the message visitors should see after the form reaches its maximum submission limit.
Example: This form has reached its maximum submission limit and is now closed.
Per-User / IP / Email Limit Settings
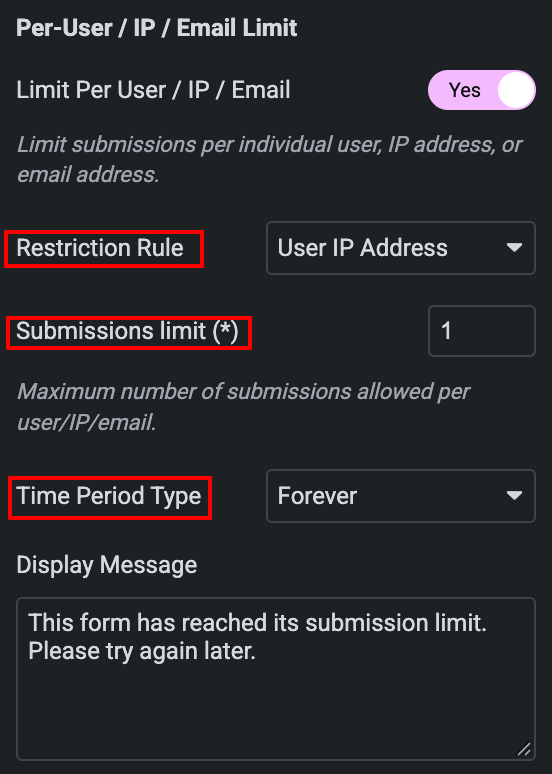
This section lets you control how many times an individual visitor can submit the form.
Enable:
Limit Per User / IP / Email → Yes
You can then configure the restriction based on the available identification method.
Restriction Rule
Choose how the plugin identifies the visitor.
Available methods include:
- User IP Address
- Logged-in User
User IP Address
Limits submissions based on the visitor’s IP address.
Example:
Maximum submissions: 1
A visitor who has already reached the limit cannot submit the form again during the selected period.
Limits submissions based on the email address submitted through the form.
This is useful when you want to prevent the same email address from submitting repeatedly.
Logged-in User
Limits submissions based on the logged-in WordPress user.
This is useful for forms that are intended for registered users.
The plugin’s current product documentation confirms these three restriction methods.
Submissions Limit
Enter the maximum number of submissions allowed for each user, IP address, or email.
Example: 1
This means each identified visitor can submit the form once during the selected time period.
Example:
Submissions limit: 1
Time Period: Forever
Result:
First submission → Allowed
Additional submission → Blocked
Time Period Type
The Time Period Type determines how long the submission restriction remains active.
Depending on the selected configuration, you can use periods such as:
- Per 24 hours
- Per 7 days
- Per month
- Till end of day
- Till end of week
- Till end of month
- Till end of year
- Custom period
- Forever
The plugin also supports custom intervals, such as allowing a submission again every X hours.
Display Message
The Display Message is shown when a visitor reaches their individual submission limit.
Example:
This form has reached its submission limit. Please try again later.
You can customize this message to match your website or campaign.
How to Test the Submission Limit
After configuring the settings, save/update the Elementor page.
Test 1: First Submission
Open the form on the frontend and submit it.
The first submission should be accepted if the configured limit has not been reached.
Test 2: Repeat Submission
Submit the form again using the same restriction criteria.
For example, if the rule is:
Restriction Rule: User IP Address
Submissions Limit: 1
Time Period: Forever
the second submission should be blocked.
The visitor will see the configured Display Message.
Test 3: Total Form Limit
If you have configured:
Total Submissions Limit: 100the form will close once the total number of submissions reaches 100.
Combining Total and Individual Limits
You can use both types of restrictions to create more controlled forms.
For example:
Total Form Limit: 100
Per-User Limit: 1
Restriction Rule: Email
This means:
- The campaign accepts a maximum of 100 submissions.
- Each email address can submit only once.
This setup is particularly useful for limited-entry campaigns and giveaways.