
The Subscription Plans plugin extends WooCommerce by adding recurring billing functionality, subscription management, free trials, sign-up fees, and multiple subscription plans.
Plugin Installation
- Navigate to Plugins → Add New.
- Click Upload Plugin.
- Select the plugin ZIP file.
- Click Install Now.
- Activate the plugin.
After activation, a new menu appears: WooCommerce → Subscriptions. This section allows you to:
- Manage subscriptions
- View recurring orders
- Monitor customer subscriptions
Create a subscription product
A step-by-step guide to configuring and publishing your first subscription product in WooCommerce.
YeeSubscriptions adds a specialized product type directly into the native WooCommerce product editor. Follow these steps to build your offering:
Step 1: Create a subscription product.
- Create a New Product: Navigate to Products > Add New from your WordPress admin dashboard.
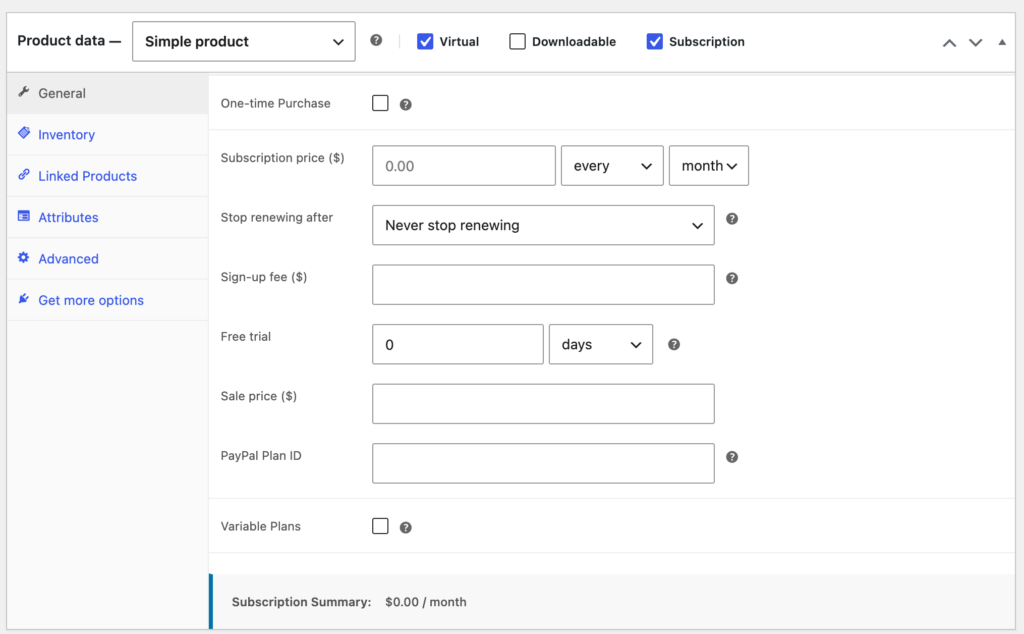
- Select Product Data Type Simple product -> Checked Subscription. Once the Subscription checkbox is selected, the General tab will update to display subscription-specific fields:
Step 2: Configure Pricing and Billing Cycle
Configure your subscription parameters as follows:
- One-time Purchase: Check this box if you want to allow customers to buy this product as a regular, non-recurring item in addition to the subscription option.
- Subscription price ($): Set the recurring amount and frequency. Enter the monetary value in the first field, then use the dropdowns to specify the interval (e.g., every, every 2nd, etc.) and period (day, week, month, year).
- ⚠️ Note: To offer a free subscription or handle custom pricing via API, you can input
0.00. However, ensure your payment gateway supports zero-dollar recurring schemes before launching.
- ⚠️ Note: To offer a free subscription or handle custom pricing via API, you can input
- Stop renewing after: Define the lifespan of the subscription. Select Never stop renewing for an ongoing billing cycle that requires manual cancellation, or choose a specific duration (e.g., 12 months) after which the subscription will automatically expire.
- Sign-up fee ($): Enter an optional initial fee charged only at the moment of registration. This is an upfront cost added to the regular subscription amount for the first billing cycle. Leave blank if there is no setup cost.
- Free trial: Offer a complimentary testing period before the billing cycle kicks in. Input a number and choose the time unit (days, weeks, months, years). The system will delay the first recurring payment until this trial period ends.
- Sale price ($): Set a discounted recurring price if you are running a promotional campaign.
- PayPal Plan ID: For seamless PayPal Billing integration, input the corresponding remote Plan ID (e.g.,
P-XXXXXXXXXXXXXXXXXXXXX). This binds your WooCommerce product metrics directly to the automated PayPal Billing engine.
- Variable Plans: Check this option if you intend to convert this into a variable subscription product, allowing you to define distinct pricing variations (e.g., Tier 1, Tier 2) under a single product entry.
Configure Variable Plans
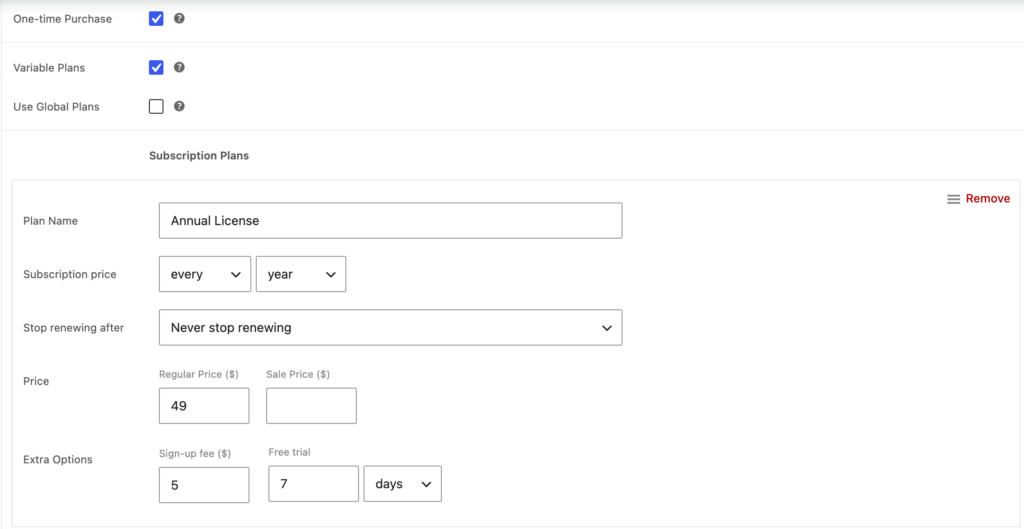
When the Variable Plans checkbox is selected, the interface expands to allow you to create and manage multiple pricing tiers or subscription options within a single product.
- Use Global Plans: Check this box if you want to link this product to globally predefined subscription templates instead of creating custom plans for this specific product.
- Subscription Plans Section: Click the Add Plan button to dynamically generate a new plan block. You can add multiple blocks to build a flexible pricing matrix (e.g., Monthly, Yearly tiers). Each plan contains the following settings:
- Plan Name: Enter a descriptive name for this specific tier (e.g., Monthly Delivery, Premium Access). This name will be visible to customers at checkout.
- Subscription price: Define the billing frequency for this specific plan using the dropdown menus (e.g., every month, every 3 months).
- Stop renewing after: Set the expiration duration for this tier, or keep it at Never stop renewing for continuous automated billing.
- Price Fields:
- Regular Price ($): Set the standard recurring amount to charge for each cycle.
- Sale Price ($): Enter an optional promotional recurring price for marketing campaigns.
- Extra Options:
- Sign-up fee: Enter an optional initial fee charged only at the moment of registration.
- Free trial: Offer a complimentary testing period before the billing cycle kicks in.
- PayPal Plan ID: Displays
Auto-generated on save. The system will automatically handle the API communication with PayPal and fetch a remote Plan ID once you click Update/Publish the product. - Remove Button: Click the Remove button in the top-right corner of any plan block to delete that specific tier from the product.
Customize Frontend Display via Settings
Beyond the product-level setup, you can fully control how these Variable Plans are styled and presented to your customers on the frontend.
Navigate to WooCommerce > Settings->Subscriptions
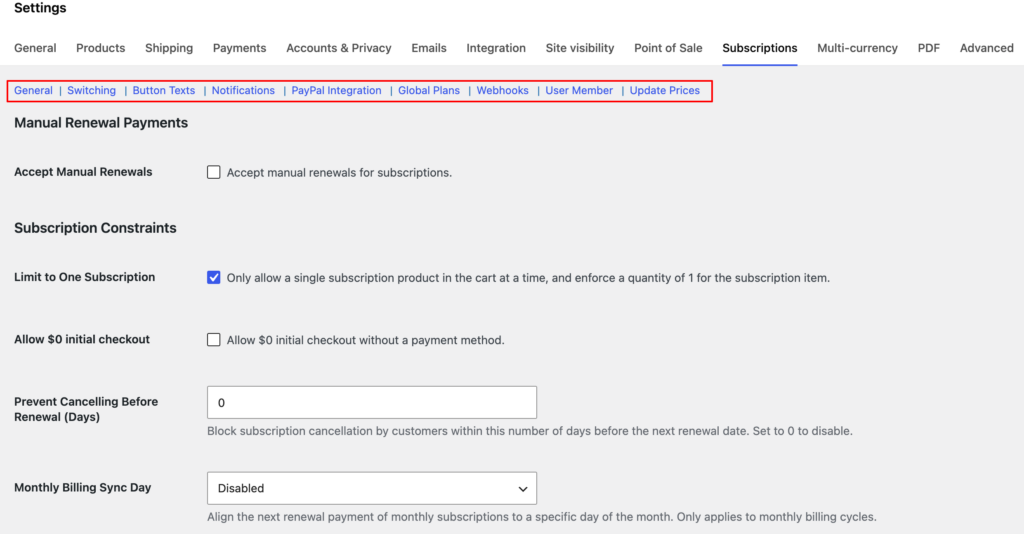
General: Controls core subscription behavior.
Includes:
- Manual renewals
- Subscription restrictions
- Renewal scheduling
- Retry attempts
- Grace periods
This section defines how subscriptions operate across the store.
Switching: Allows customers to switch plans.
Examples: Upgrade/Downgrade/Change billing cycle
Useful for SaaS and membership products.
Button Texts: Customize storefront text.
Examples: Subscribe Now/Upgrade Plan/Renew Subscription/ Lifetime license
Helps match subscription terminology to your business.
Notifications: Configure subscription emails and alerts.
Examples:
- New subscription
- Upcoming renewal
- Payment failure
- Cancellation
Keeps customers informed throughout the subscription lifecycle.
PayPal Integration: Connect subscription plans with PayPal recurring billing.
Used for automated subscription payments.
Global Plans: Create reusable subscription plans.
Benefits:
- Faster product creation
- Consistent pricing
- Centralized plan management
A single plan can be assigned to multiple products.
Webhooks: Send subscription events to external services.
User Member: Control membership access based on subscription status.
Examples:
- Active subscribers gain access
- Cancelled subscribers lose access
Update Prices: Manage subscription pricing updates.
Administrators can:
- Adjust renewal prices
- Update plan pricing
- Apply new pricing strategies
This allows pricing changes without recreating subscription products.
The Customer Subscription Journey
Adding the Subscription to the Cart
After selecting a subscription plan, customers can add it to their cart just like any standard WooCommerce product.
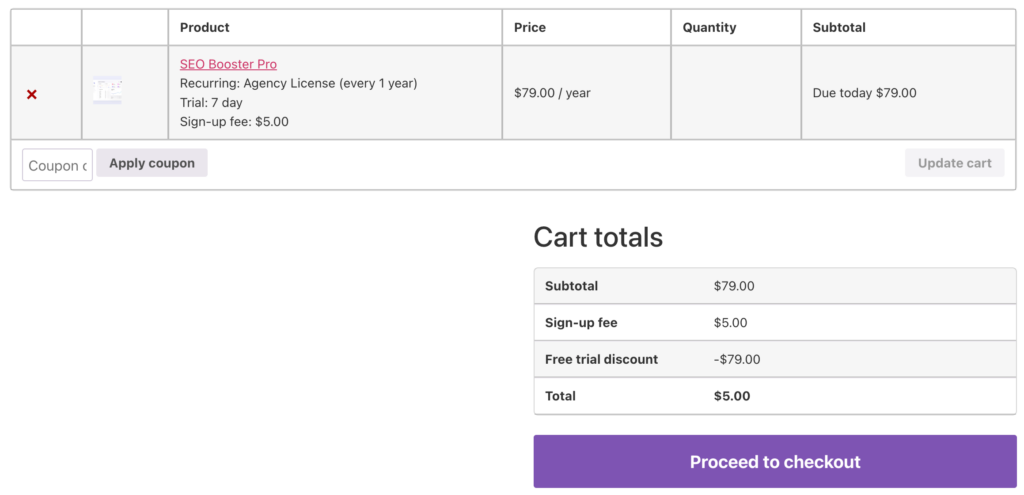
The cart page displays subscription-specific information, including:
- Selected plan
- Subscription price
- Billing interval
- Sign-up fee
- Trial period
- Initial payment amount
This gives customers another opportunity to review their subscription before proceeding to checkout.
For products that include a free trial, the cart clearly indicates when the first recurring payment will occur.
For products with sign-up fees, customers can immediately see any one-time charges that will be included in their first payment.
Completing Checkout
The checkout process follows the familiar WooCommerce checkout flow while displaying subscription-related information.
Order Confirmation
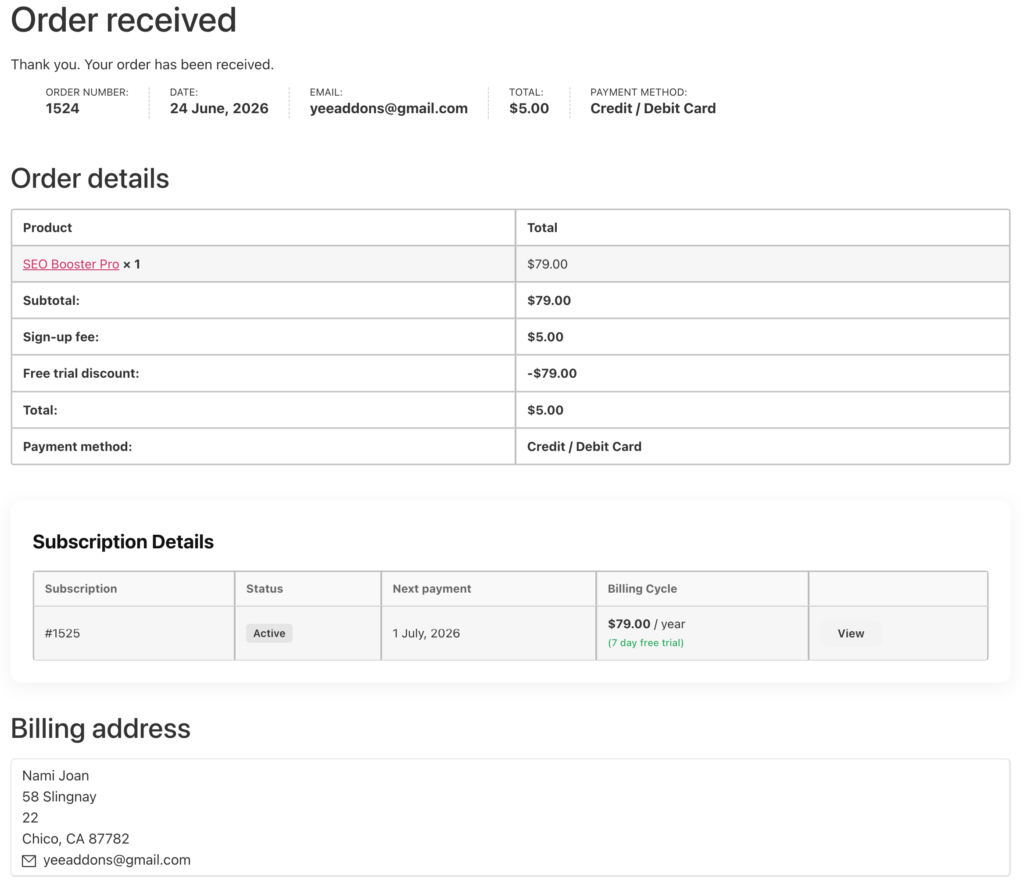
After checkout is completed successfully, WooCommerce generates an order confirmation page.
In addition to the standard order information, customers can immediately view their subscription details.
Information displayed may include:
- Subscription status
- Subscription ID
- Billing cycle
- Next payment date
- Renewal amount
- Trial information
This confirmation page serves as the customer’s first overview of their newly created subscription.
Customers can immediately verify that their subscription has been activated successfully.
Accessing Subscription Information
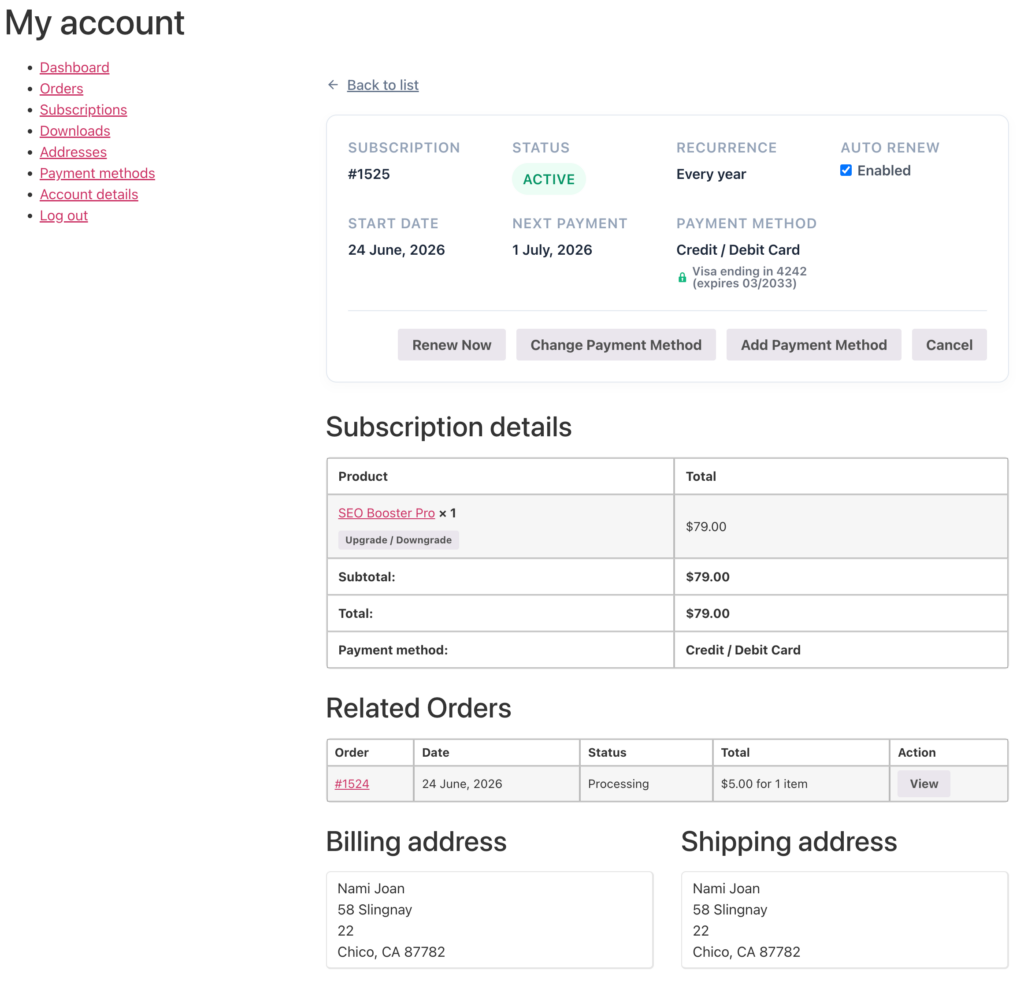
After placing an order, customers can manage their subscriptions from their WooCommerce account.
Navigate to: My Account → Subscriptions
The Subscriptions page provides a centralized location for managing all active and past subscriptions.
Customers can quickly see:
- Subscription status
- Product name
- Billing cycle
- Next payment date
- Renewal amount
For stores that offer multiple subscriptions, this page makes it easy to track all recurring purchases in one place.
Managing Subscriptions in WooCommerce
Once customers begin purchasing subscription products, store administrators need an efficient way to monitor subscription activity, manage renewals, and handle customer requests. Subscription Plans provides a centralized subscription management system directly within WooCommerce, making it easy to oversee every stage of the subscription lifecycle.
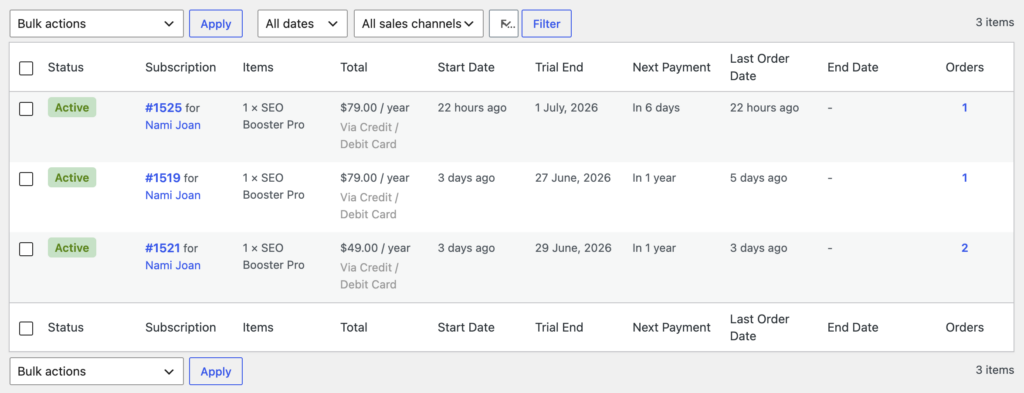
All subscriptions created through the plugin can be accessed from: WooCommerce → Subscriptions
From this dashboard, administrators can view active subscriptions, monitor upcoming renewals, manage subscription statuses, review payment history, and update subscription details when necessary.
Viewing All Subscriptions
The Subscriptions dashboard provides a complete overview of all subscription records in your store.
For each subscription, administrators can quickly view:
- Subscription ID
- Customer name
- Associated product
- Current subscription status
- Renewal amount
- Next payment date
- Billing schedule
- Creation date
This overview allows store owners to easily track subscription activity and identify subscriptions that may require attention.
For stores with a large number of subscribers, the subscription list can serve as a central management hub for monitoring recurring revenue and customer activity.
Accessing Subscription Details
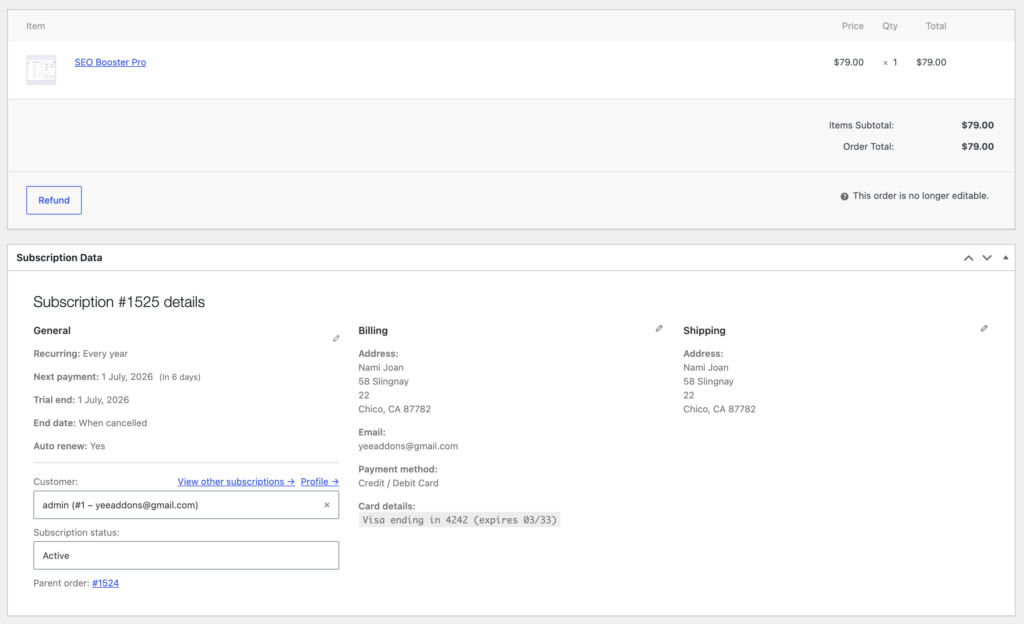
Clicking on a subscription opens the detailed subscription management screen.
Subscription details are typically organized into several sections.
General Information
The General Information section provides an overview of the subscription.
This includes:
- Subscription ID
- Subscription status
- Creation date
- Start date
- End date (if applicable)
- Customer account information
Administrators can use this information to quickly verify the subscription’s current state.
Billing Schedule
The Billing Schedule section displays the recurring payment configuration.
Information may include:
- Billing interval
- Renewal frequency
- Trial period
- Next payment date
- Last payment date
For example:
$49 Every Year
Next Payment: January 1, 2027
This section helps administrators understand when future renewals will occur and verify that the subscription schedule is functioning correctly.
Customer Information
Each subscription is linked to a customer account.
Administrators can review:
- Customer name
- Email address
- Billing address
- Shipping address (if applicable)
This information is particularly useful when handling support requests or investigating payment issues.
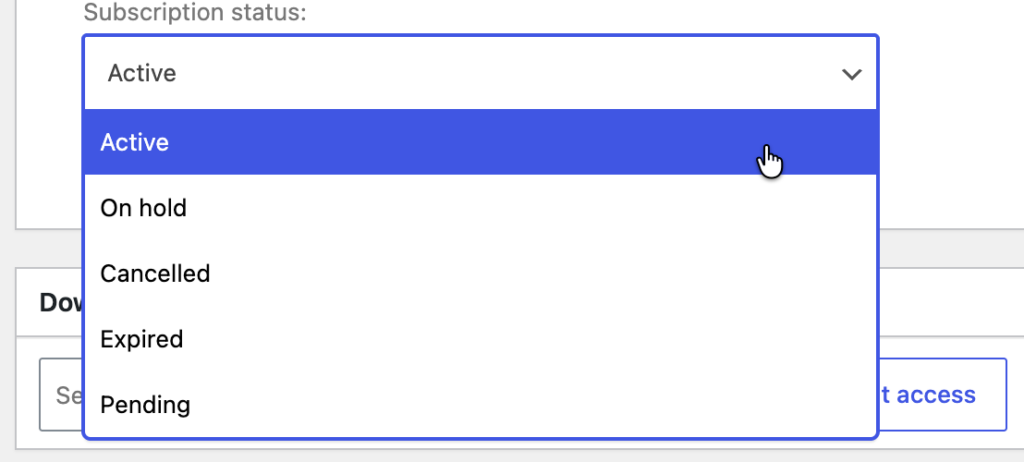
Managing Subscription Statuses
Subscription status management is one of the most important administrative functions. Store owners can manually update subscription statuses whenever required.
Updating Renewal Dates
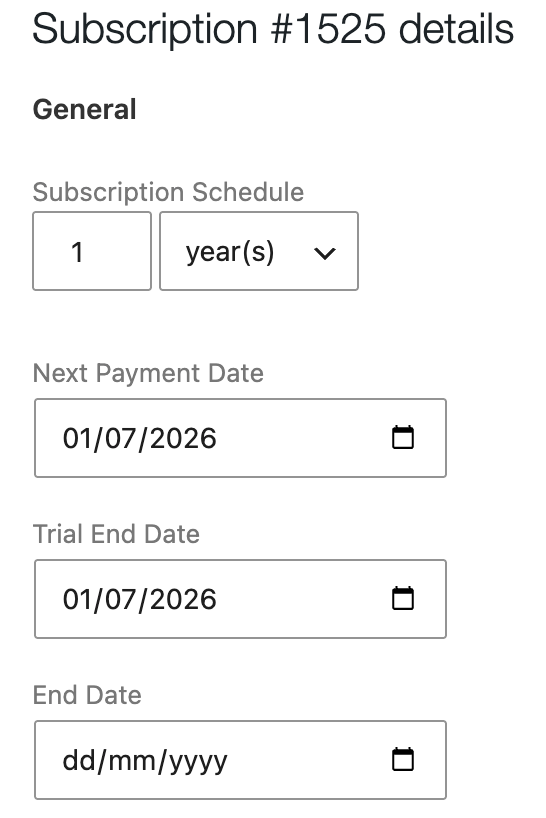
In certain situations, administrators may need to modify a subscription’s renewal schedule.
Subscription Plans allows renewal dates to be adjusted directly from the subscription details page.
Monitoring Renewal Payments
Each time a subscription renews, the plugin automatically creates a renewal order.
Administrators can monitor these renewals to ensure payments are processed successfully.
For every renewal, store owners can review:
- Renewal amount
- Payment status
- Transaction details
- Renewal date
Tracking renewal payments helps identify failed transactions and ensures recurring revenue continues without interruption
Customer Support and Subscription Administration
Subscription management tools are especially useful when responding to customer support requests.
Common administrative actions include:
- Verifying subscription status
- Confirming renewal dates
- Reviewing payment history
- Updating billing schedules
- Reactivating subscriptions
- Cancelling subscriptions
- Extending subscription access
Having all subscription information stored in a single location makes support requests easier to resolve and improves the overall customer experience.
Subscription Email Notifications
Subscription Email Notifications help keep both customers and store administrators informed about important subscription events throughout the subscription lifecycle.
These automated emails improve communication, reduce support requests, and ensure customers always know the current status of their subscriptions.
The plugin includes a comprehensive set of subscription-related notifications covering subscription creation, renewals, free trials, payment failures, expirations, and more.
Accessing Email Notifications
To manage subscription emails:
WooCommerce → Settings → Emails
Here you will find all available subscription-related email notifications. Each email can be enabled or disabled individually and customized according to your business requirements.
Most email templates allow you to:
- Enable or disable the notification
- Customize the email subject
- Modify the email heading
- Configure recipient information
- Edit email content
- Preview the email template
Email Template
Subscription Renewal Emails
- Processing Renewal Order
- Completed Renewal Order
- On-hold Renewal Order
- Customer Renewal Invoice
Subscription Reminder Emails
- Automatic Renewal Notice
- Manual Renewal Notice
Free Trial Emails
- Free Trial Expiration Automatic Payment Notice
- Free Trial Expiration Manual Payment Notice
Subscription Lifecycle Emails
- Cancelled Subscription
- Expired Subscription
- Suspended Subscription
- Reactivated Subscription
- Subscription Expiration Notice
- Subscription Grace Period Warning
Payment & Authentication Emails
- Failed Subscription Renewal SCA Authentication
- Payment Authentication Requested
Administrator Emails
- New Renewal Order
- Customer Subscription Price Updated