Yeekit Checkout Field Blocks for WooCommerce is a block-based checkout customization plugin designed for the modern WooCommerce Checkout Block. It lets store owners add visual and interactive custom fields directly inside the WordPress block editor, collect additional customer information, control field layout, and display submitted values with the order.
What the Plugin Solves
Collect additional information that WooCommerce’s default checkout does not provide.
Build custom checkout experiences directly with Gutenberg / WooCommerce Blocks.
Add different field types for text, contact information, dates, selections, colors, images, and more.
Make fields required when the customer must provide an answer.
Control field width to create one-column or multi-column layouts.
Use conditional logic to show or hide fields based on checkout information.
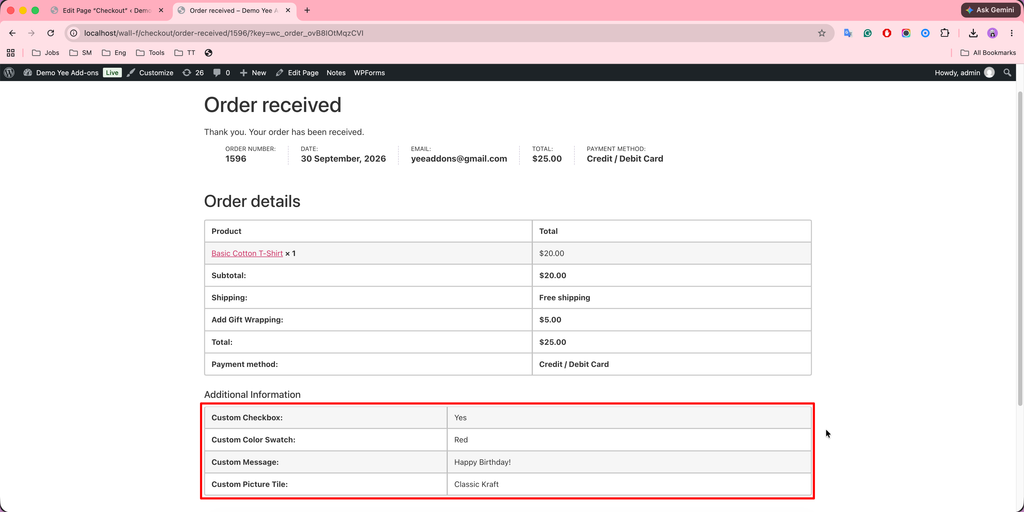
Display collected custom values in WooCommerce order management and customer-facing order views.
Support modern WooCommerce order storage through HPOS.
Installation & Initial Setup
1. Install the plugin from the WordPress Plugins screen or upload the plugin package.
2. Activate the plugin.
3. Open the Checkout page in the WordPress Block Editor / Site Editor.
4. Select the WooCommerce Checkout Block.
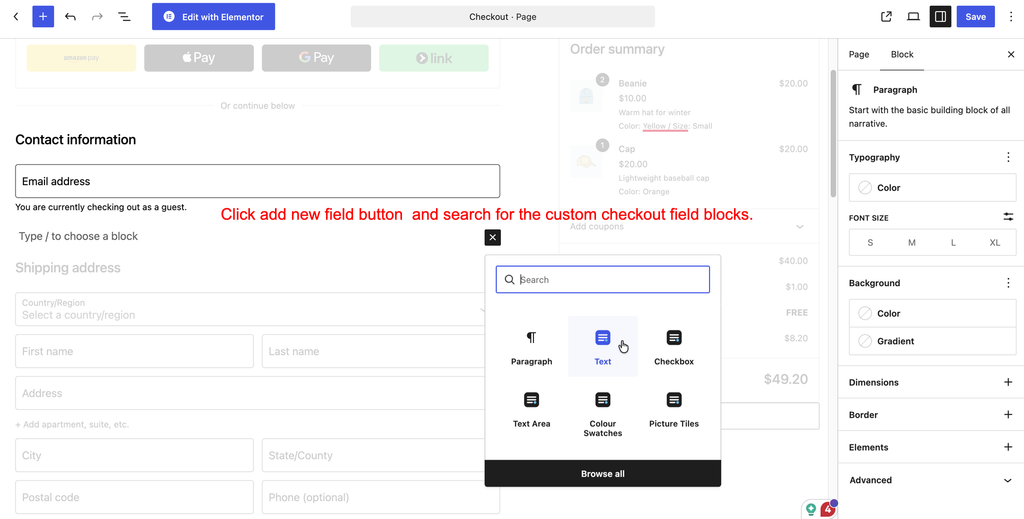
5. To add a new field, click add new field button within the section and search for the custom checkout field blocks.
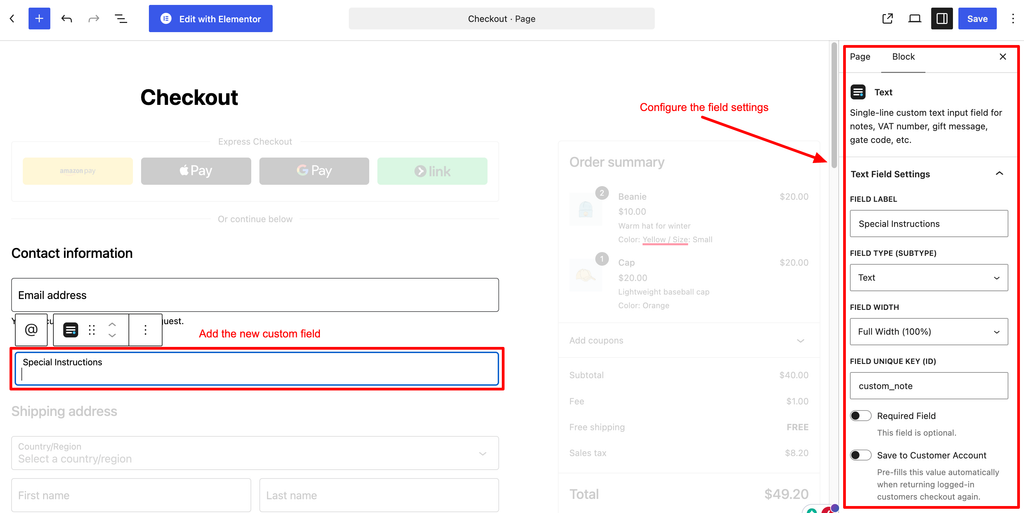
6. Configure the field settings in the block sidebar.
7. Update the page and test the checkout on the storefront.
Field Types – Complete Reference
The current WordPress.org listing describes the plugin as ACF Checkout Fields for WooCommerce and states that it provides 17+ visual custom field blocks, WooCommerce Checkout Block / Cart Block compatibility, HPOS support, flexible field widths, and customer/admin display of submitted values.
| Field Type | What It Does | Good Use Cases |
| Text | Single-line text input. | PO number, company name, gift note, reference ID. |
| Textarea | Multi-line text input. | Gift message, delivery instructions, special notes. |
| Email input with email-format validation. | Secondary email, contact email. | |
| Phone | Telephone number input. | Secondary phone, WhatsApp number. |
| Number | Numeric input with min/max/step controls. | Quantity-related information, numeric IDs, measurements. |
| Password | Masked input for sensitive text such as a PIN. | Gate code or other masked entry. |
| URL | Web address input with URL validation. | Website, portfolio, social link. |
| Select / Dropdown | Dropdown selection with configurable options. | Delivery window, referral source, preferred service. |
| Checkbox | Single or multiple checkbox options. | Gift wrapping, confirmation, delivery preference. |
| Radio | Single-choice option group. | Pickup method, service preference, packaging choice. |
| Date | Calendar-based date picker. | Preferred delivery date, event date, birthday. |
| Time | Time picker. | Preferred delivery time, call time, pickup time. |
| DateTime | Combined date and time picker. | Appointment, delivery slot, event schedule. |
| Slider / Range | Range selector with min/max/step and optional units. | Rating, percentage, quantity, budget range. |
| Color Picker | Native color selection control. | Custom color, personalization color. |
| Color Swatches | Visual predefined color options. | Gift-wrap color, packaging, monogram color. |
| Picture Tiles | Image-based visual option selector. | Gift-wrap style, card template, fabric/design option. |
| Digital Signature (Pro) | Interactive signature pad. | Customer approval or signature confirmation. |
| File Upload (Pro) | File upload control with drag-and-drop support. | Artwork, reference file, personalization asset. |
Conditional Logic
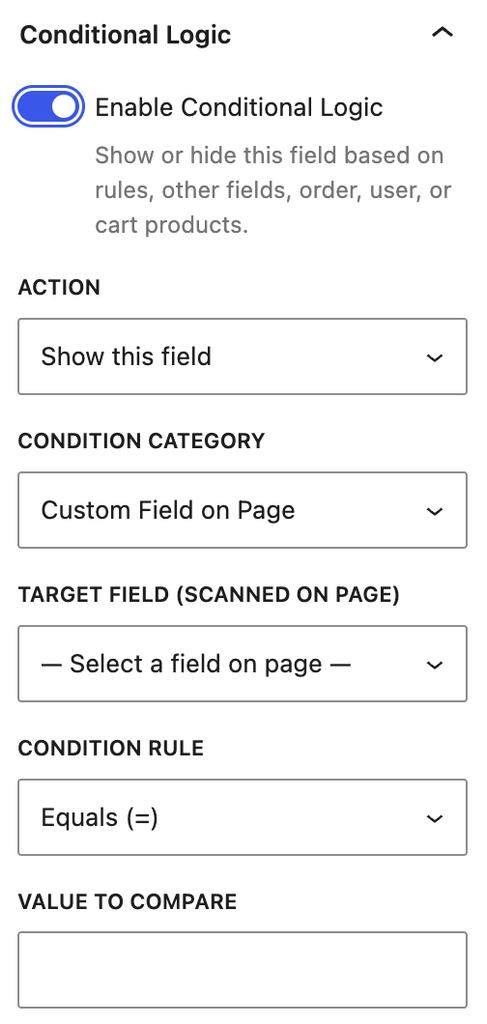
Conditional Logic allows a field to be shown or hidden based on rules. In the provided product interface, the Conditional Logic panel includes an Enable Conditional Logic switch, an Action selector, a Condition Category selector, a Target Field selector, and a Condition Rule selector.
Interface Elements
Enable Conditional Logic – Turns the rule system on for the current field.
Action – Determines what happens when the condition is met, such as showing the field.
Condition Category – Selects the type/source of condition.
Target Field – Identifies the field that is evaluated.
Condition Rule – Defines the test applied to the target field.
Example: Gift Wrapping Workflow
A practical demonstration is to use one Checkbox as the trigger for three dependent fields.
Video: WooCommerce Block Checkout Fields – Add Gift Wrapping with Conditional Logic
| Dependent Field | Action | Category | Target | Rule |
| Add Gift Message | Show this field | Custom Field on Page | Add Gift Wrapping [Checkbox] | Is Checked (Checkbox) |
| Add Gift Wrap Color | Show this field | Custom Field on Page | Add Gift Wrapping [Checkbox] | Is Checked (Checkbox) |
| Add Picture Tiles | Show this field | Custom Field on Page | Add Gift Wrapping [Checkbox] | Is Checked (Checkbox) |
Customer flow:
Gift Wrapping unchecked → dependent fields hidden.
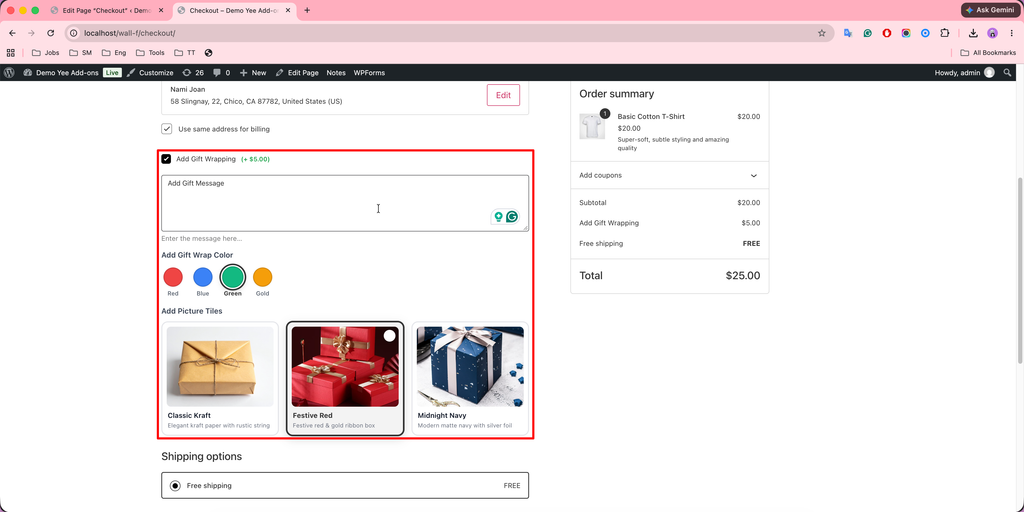
Gift Wrapping checked → Gift Message, Gift Wrap Color, and Picture Tiles appear. This keeps the checkout focused on options relevant to the customer’s choice.
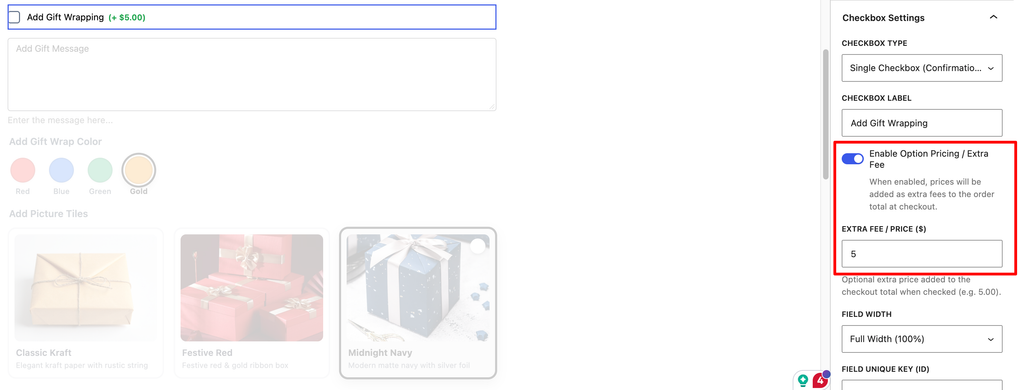
Enable Pricing Option/ Extra Fee
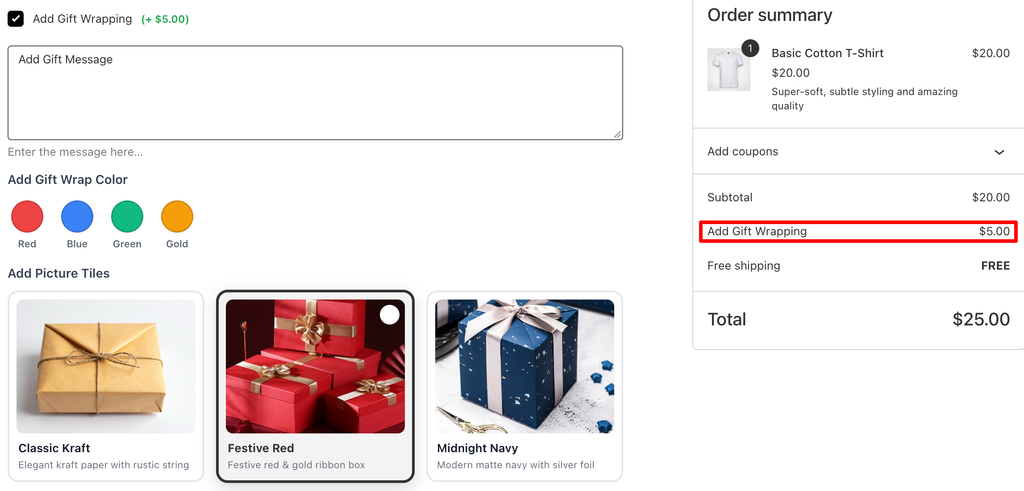
Enable Pricing allows a custom checkout field or option to have a price impact, so the customer’s selection can affect the total cost of the order.
Example – Gift Wrapping
Customer selects:
☑ Add Gift Wrapping
The checkout can apply an additional charge, for example:
Gift Wrapping: +$5.00
Then the checkout total becomes:
Product: $20.00
Gift Wrapping: +$5.00
Total: $25.00
How Custom Fields Are Saved Throughout The Order Process
On the checkout page
On the thank you page
In the order emails
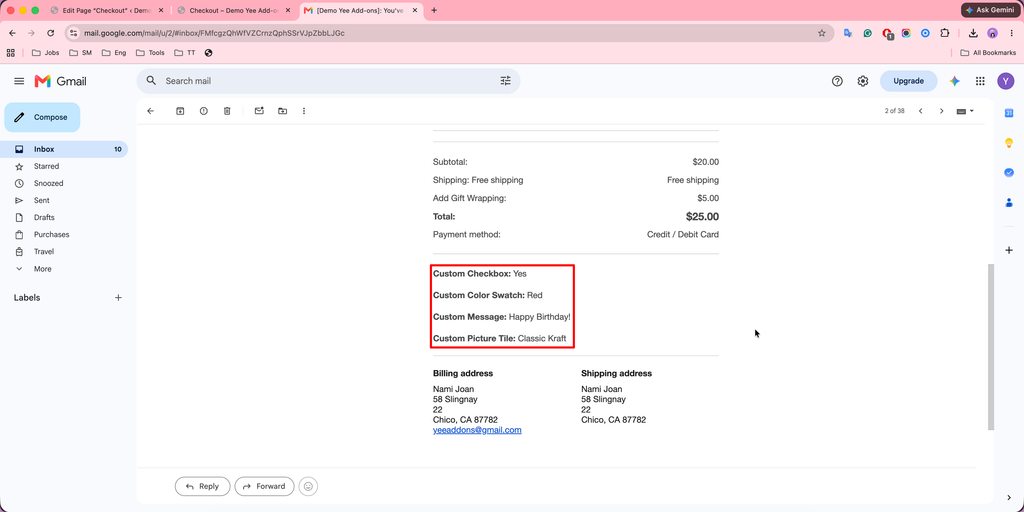
In the order details page
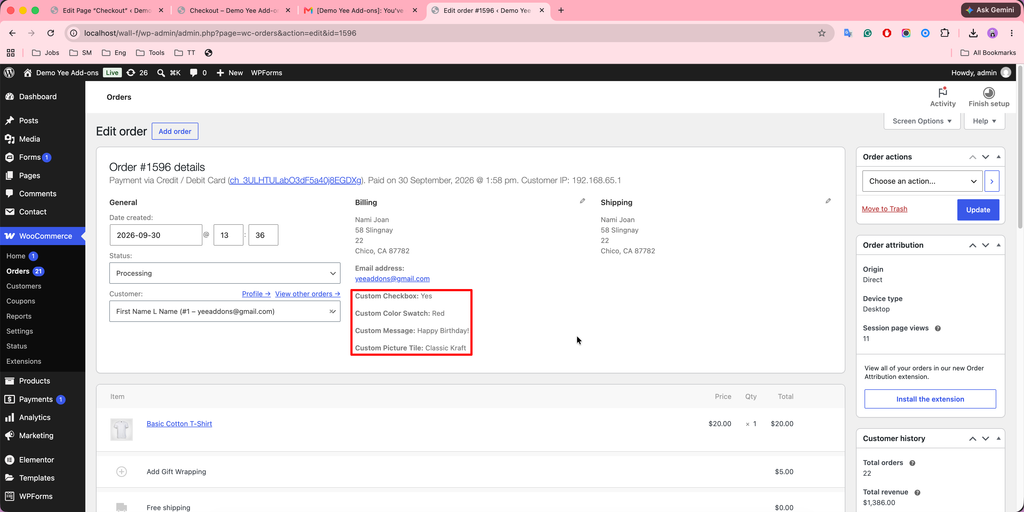
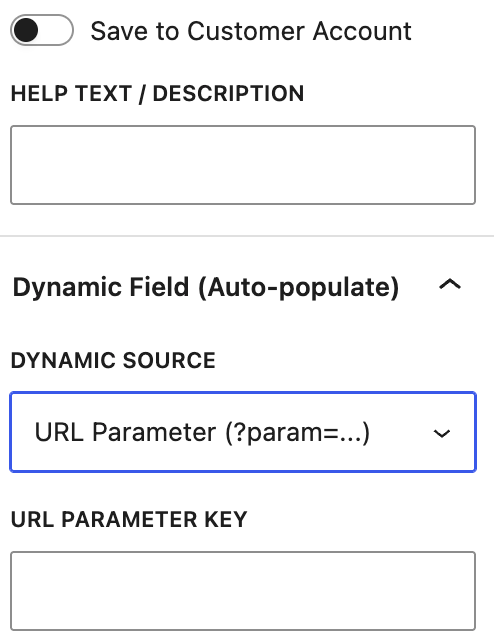
Save to Customer Account
The Save to Customer Account option allows a custom checkout field value to be associated with the customer’s account.
This option is useful for information that belongs to the customer rather than a single order, such as business or profile information.
Example
Create a custom field:
Field Label: Company Name
Field Type: Text
Unique Key: company_name
Save to Customer Account: Enabled
During checkout, the customer enters:
Company Name: ABC Studio
The value can then be stored as customer-related information instead of being treated only as information for the current order.
When to Use
Use Save to Customer Account for information that customers may provide repeatedly or that is generally associated with their customer profile.
Examples include:
- Company Name
- Tax/VAT Number
- Business information
- Customer profile information
- Other customer-level details
When Not to Use
Do not use this option for information that is specific to an individual order.
Examples:
- Gift Message
- Delivery Date
- Gift Wrap Color
- Order-specific instructions
- One-time customization choices
These values are normally more appropriate as order-specific information.
Important Note
Save to Customer Account and Dynamic Field / Auto-Populate are separate features. Save to Customer Account is used to save the field value to the customer’s account, while Dynamic Field / Auto-Populate is used to populate a field from a configured URL.